
OneXray: the detailed guide to installation, subscriptions, ping and routing
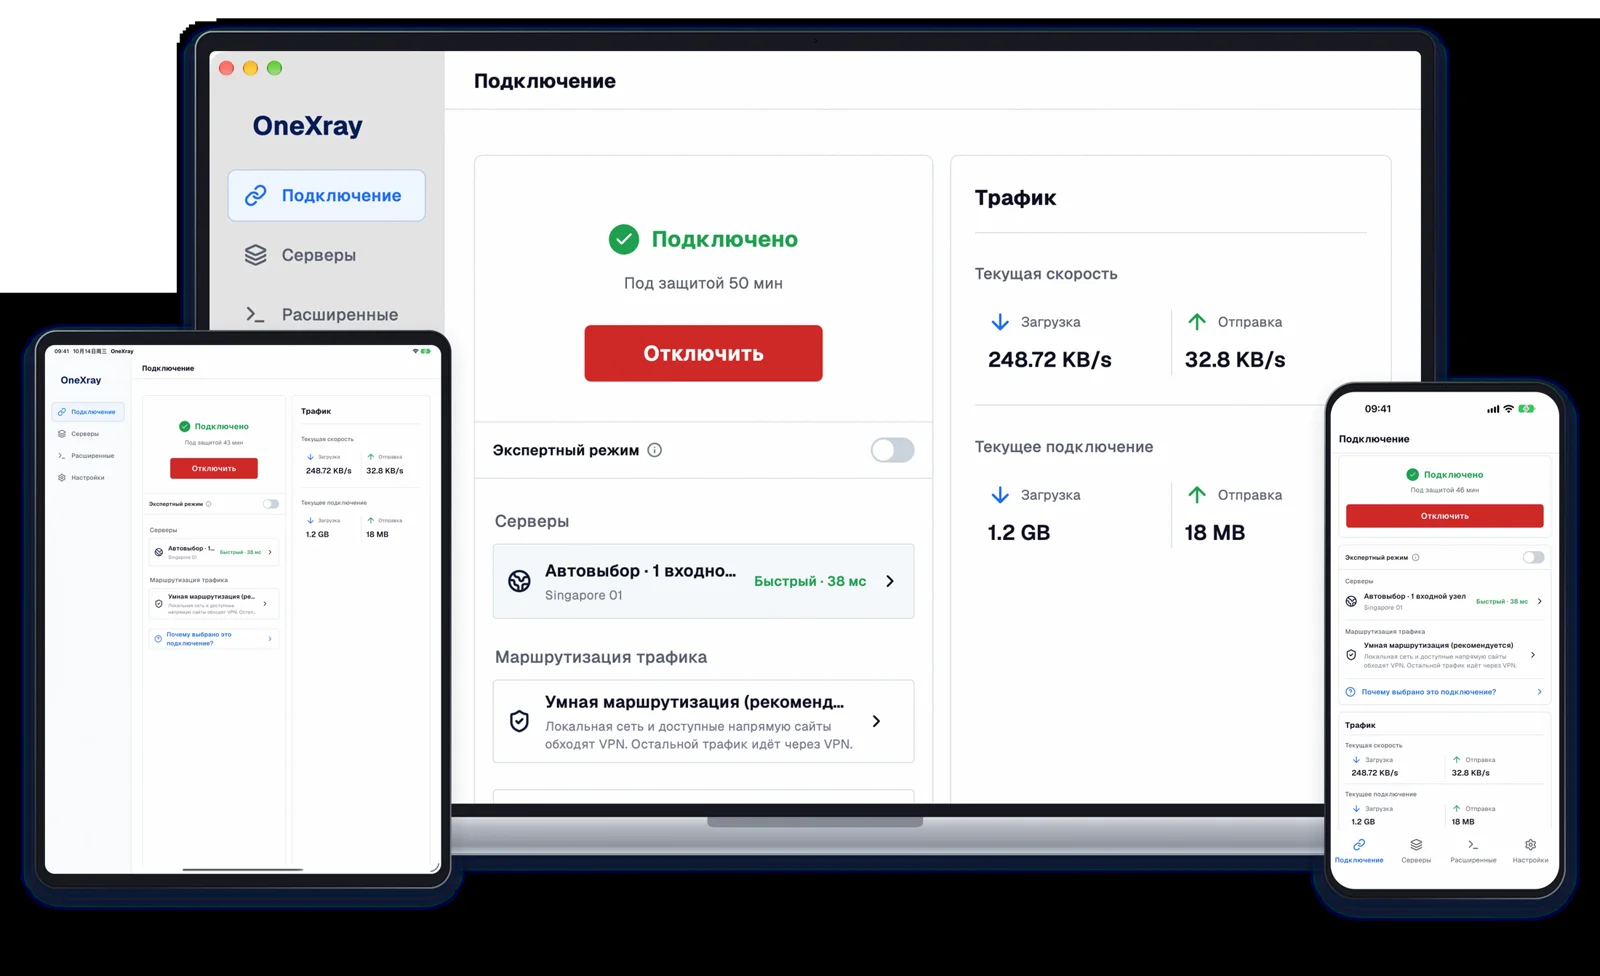
OneXray is an app for connecting to a VPN through your subscription; it works on iPhone, iPad, Android, Windows, macOS, and Linux, and it takes servers from the subscription, so you do not need to create a separate OneXray account or install Xray-core manually.
This guide walks you through your first connection, binding a device with HWID, choosing a server, checking ping, updating your subscription, and setting up rules for websites and apps.
Current as of October 28, 2026. The instructions were checked against OneXray 26.10.5. The layout depends on screen width: on a phone, the sections are at the bottom; on a tablet and a computer, they are usually on the left. The screenshots in this guide show the Russian interface; labels in the text are given as they appear in the English interface.
What you need
- A device with a supported operating system version.
- OneXray installed.
- A valid personal 4TO subscription link.
- An internet connection to download servers.
Quick connection
If the app is already installed:
- Open Servers → + → Add subscription.
- Enter a name, for example 4TO, and paste your link into the Subscription link field.
- For the first setup, leave Subscription panel → Generic and Configuration mode → By subscription format, unless you were given other settings.
- If the subscription requires device binding, turn on Send device identifier (HWID).
- Select Add subscription and wait for the download to finish.
- Open the subscription that appears and look at the type of entries:
- Remnawave — select the one configuration you need, then go to Connect.
- Regular nodes with a protocol and latency — choose one node or a suitable automatic selection mode.
- Select Connect, confirm the system permission if it appears, and wait for the connection status.
To check, open a website or app that needs a VPN. If the connection fails, start with the "Common problems" section at the end of the guide.
1. Where to download OneXray
Use the official OneXray website or the app's page in your system's store.
| Device | Requirements | Installation |
|---|---|---|
| iPhone / iPad | iOS / iPadOS 15 or later | App Store |
| Android | Android 10 or later; arm64-v8a or x86_64 | Google Play or the APK from the OneXray website |
| Mac | macOS 13 or later; Apple silicon or Intel | Mac App Store or OneXraySE from the OneXray website |
| Windows x64 | Windows 10 20H2 or later | Microsoft Store or the package from the OneXray website |
| Windows ARM64 | Windows 11 | Microsoft Store or the ARM64 package from the OneXray website |
| Linux | Kernel 5.3+, glibc 2.39+; x86_64 or arm64 | DEB or ZIP from the OneXray website |
The app is not supported on older 32-bit ARM Android devices. This guide does not cover a separate installation path for TVs: the official instructions are aimed at phones, tablets, and computers.
iPhone and iPad
- Open the OneXray page in the App Store.
- Tap Get or the cloud icon.
- Confirm the installation the way your device asks.
- Launch OneXray and go through the initial setup.
If the App Store says the app is not available in your region, use the separate guide on changing your App Store region.
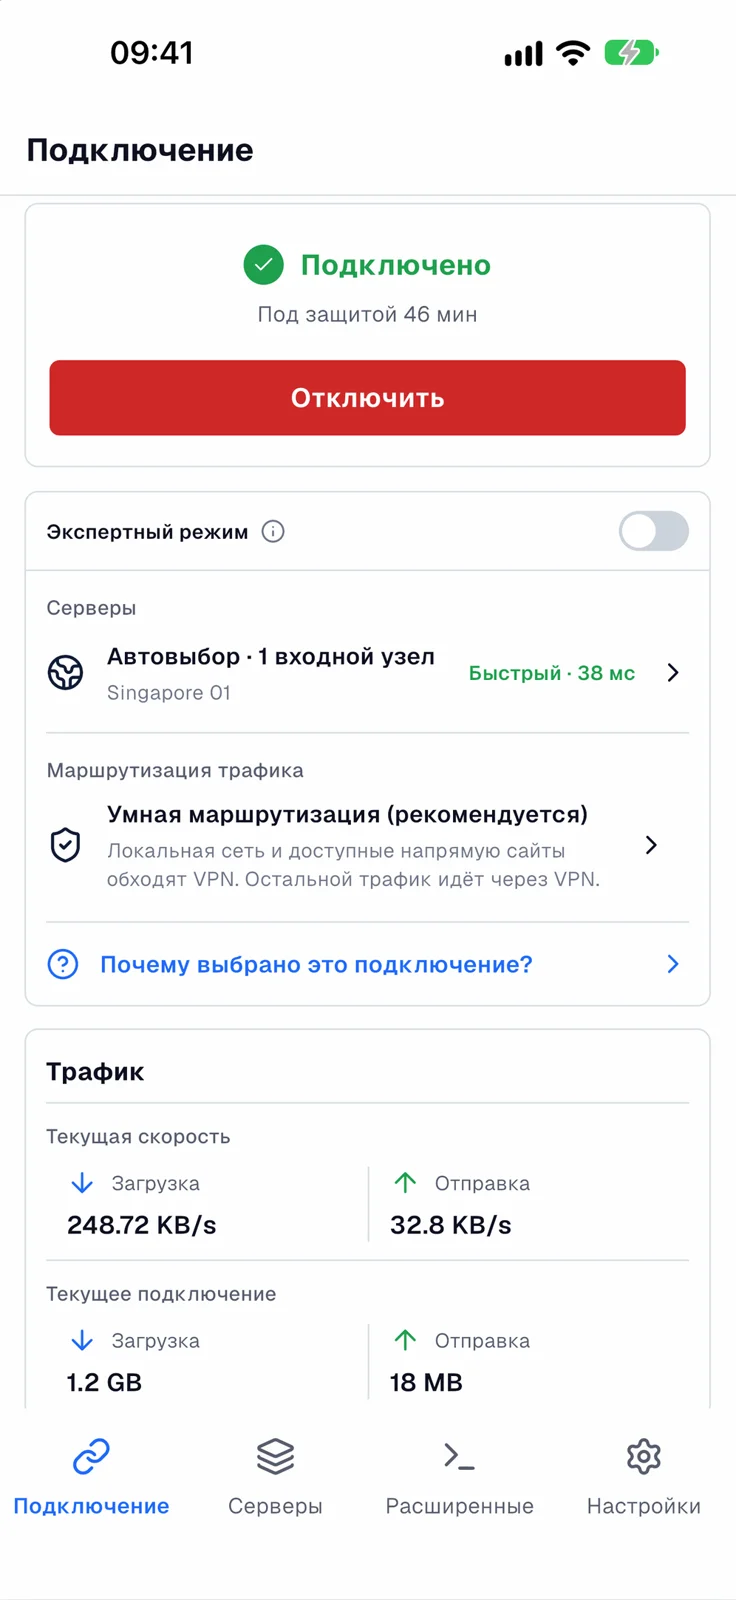
On iPhone, the main sections are in the bottom bar. The Connect screen has the connect button, the selected server, routing, and traffic counters.
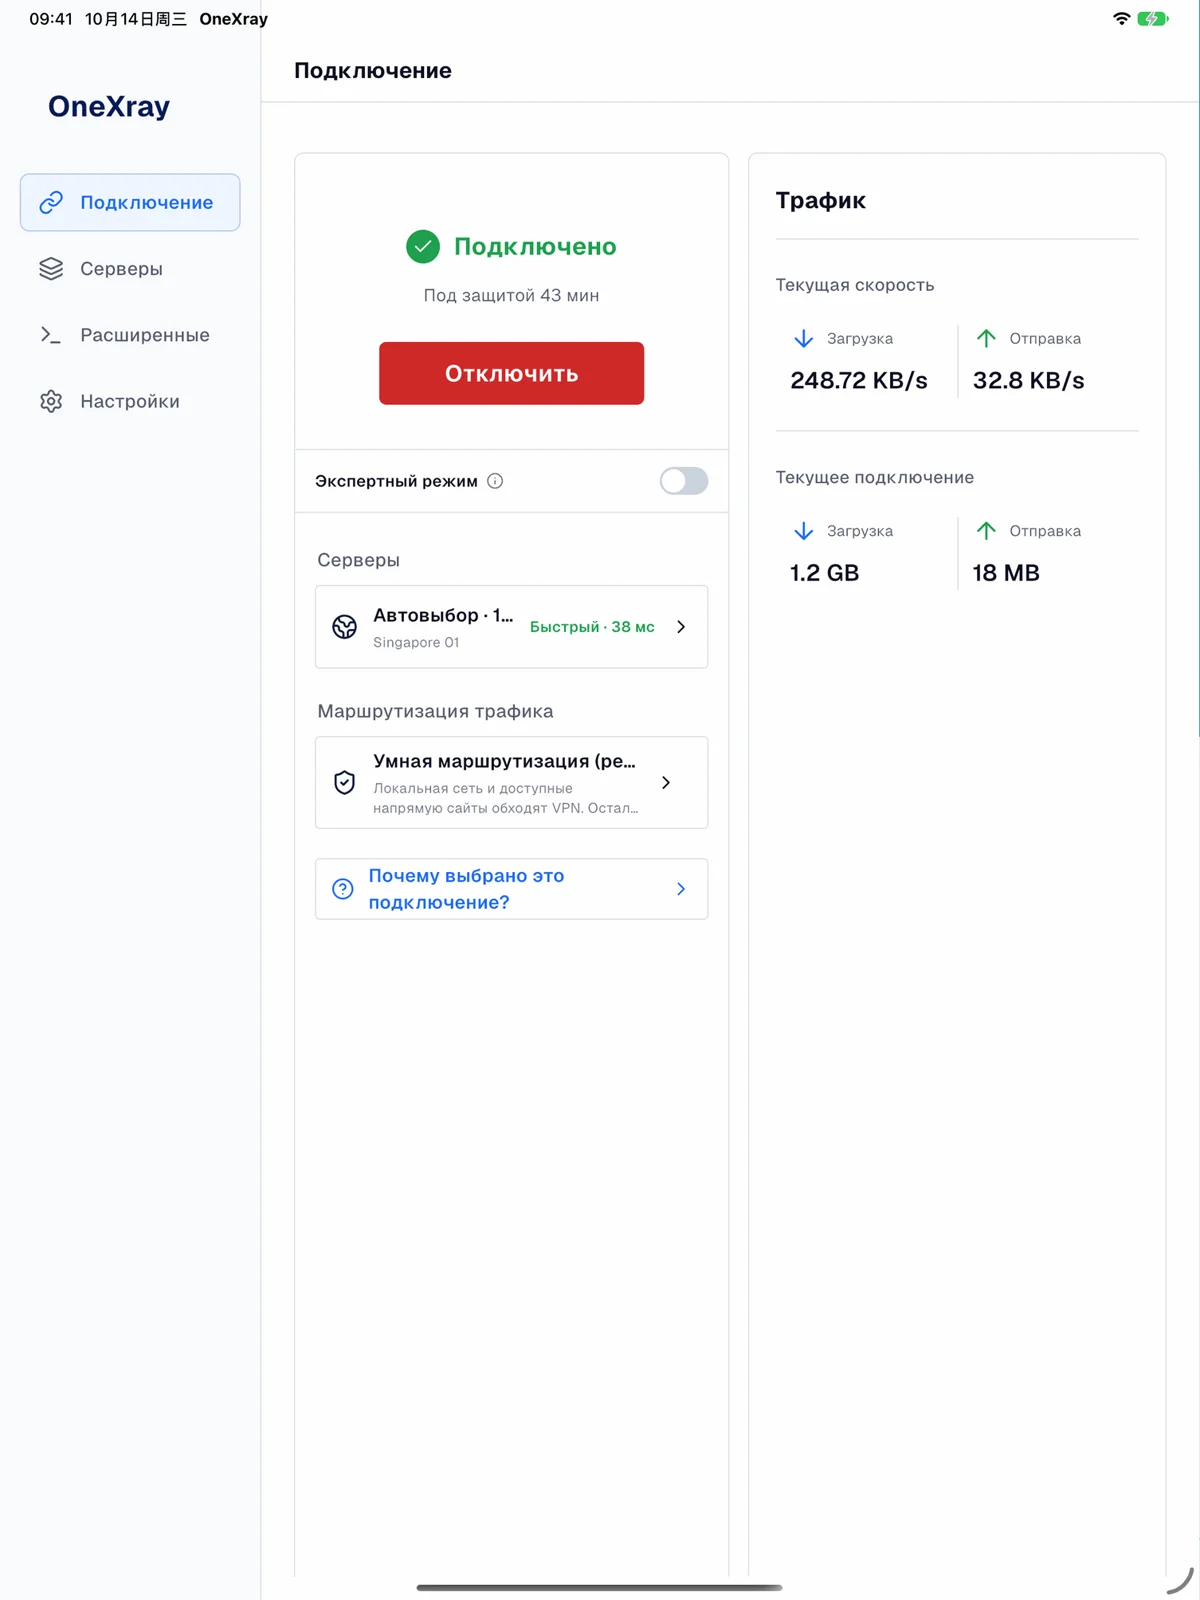
On iPad, the same functions are usually split into two columns: connection and options to the left of the statistics. There is no separate "tablet version" to look for.
Android: Google Play or APK through Chrome
Through Google Play: open the app page, tap Install, and launch OneXray.
Through APK:
- Open the official OneXray website in Chrome.
- Go to the Android download and download the APK.
- Open the downloaded file.
- If Android blocks installation from this source, allow it for Chrome.
- Go back to the APK and finish the installation.
A detailed, illustrated walkthrough for granting this permission is in the guide "How to install an APK on Android". On many devices, the relevant section starts like this: Settings → Apps → Special access. The permission is granted to the specific app you open the APK from.
When updating through an APK, install the new version over the existing one. Uninstalling the app may delete local settings and change the device identifier used by the subscription.
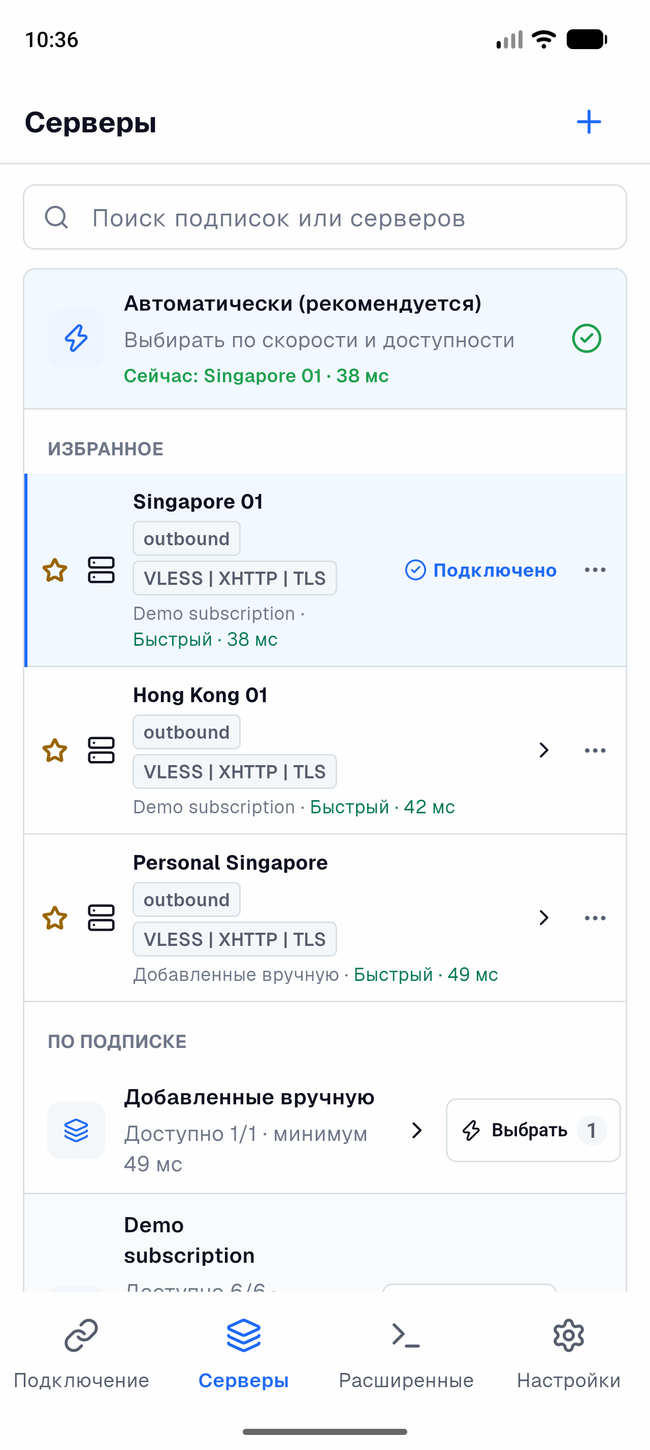
On a phone, use the bottom bar of sections. Adding a subscription is under the + button in the Servers section.
Windows
There are two installation options, and they differ in how the VPN works.
| Option | How it works | What to consider |
|---|---|---|
| Microsoft Store / MSIX | Uses the Windows system VPN | Starting Core does not require UAC; the store manages updates |
| Standalone EXE / ZIP | Uses native TUN | Starting the VPN may require UAC confirmation |
To install from the store, open the OneXray page in the Microsoft Store and press the install button.
For the standalone package, download the version for your architecture from the official website. If you chose ZIP, extract the whole archive and run the app from the extracted folder. ZIP does not create shortcuts or register links automatically.
You can change it later in Advanced → VPN tunnel → Xray outbound interface. After changing networks or connecting a different adapter, check the setting again if the VPN stops starting.
The Store version and EXE/ZIP keep their data separately. Moving between them requires transferring your settings, not just installing the other package.
macOS
On Mac, the following are available:
- OneXray from the Mac App Store — uses Packet Tunnel.
- OneXraySE from the official website — uses the macOS system network extension.
Install the store version the usual way. For the ZIP version, move OneXraySE.app to Applications, then launch the app.
Allow adding the VPN configuration. For OneXraySE, macOS may also ask you to enable the system extension in settings. Follow the system notification; if the system explicitly requires a restart, do it.
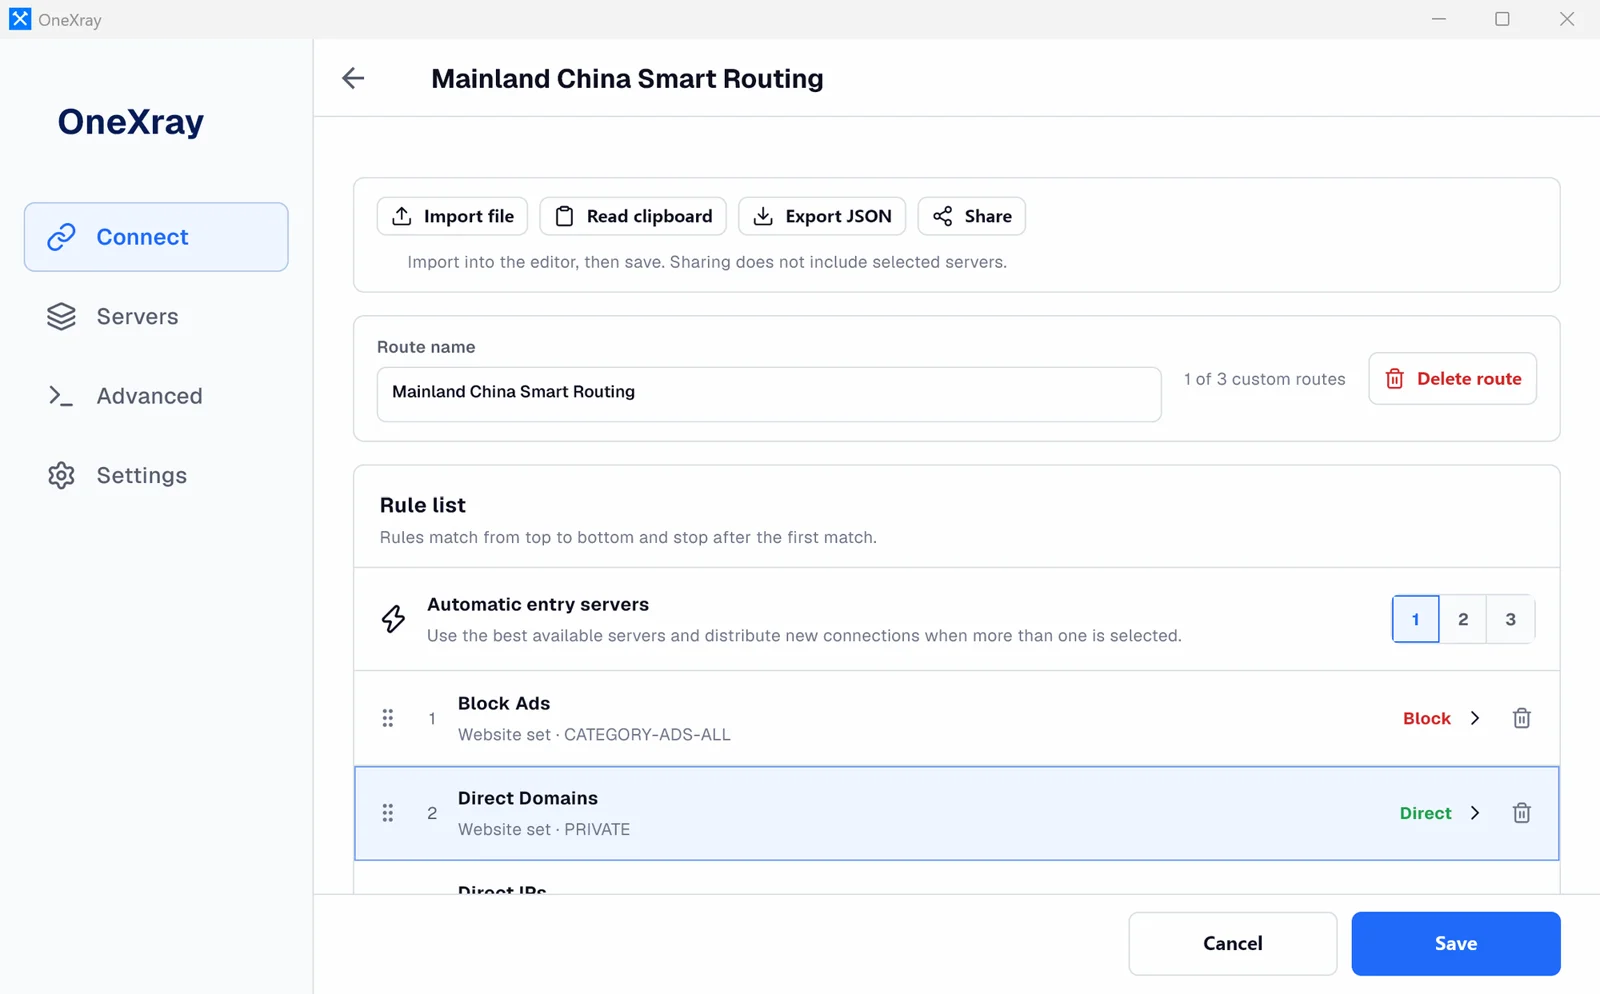
On a computer, the main sections are in the sidebar. For example, this is what the Smart Routing editor looks like:
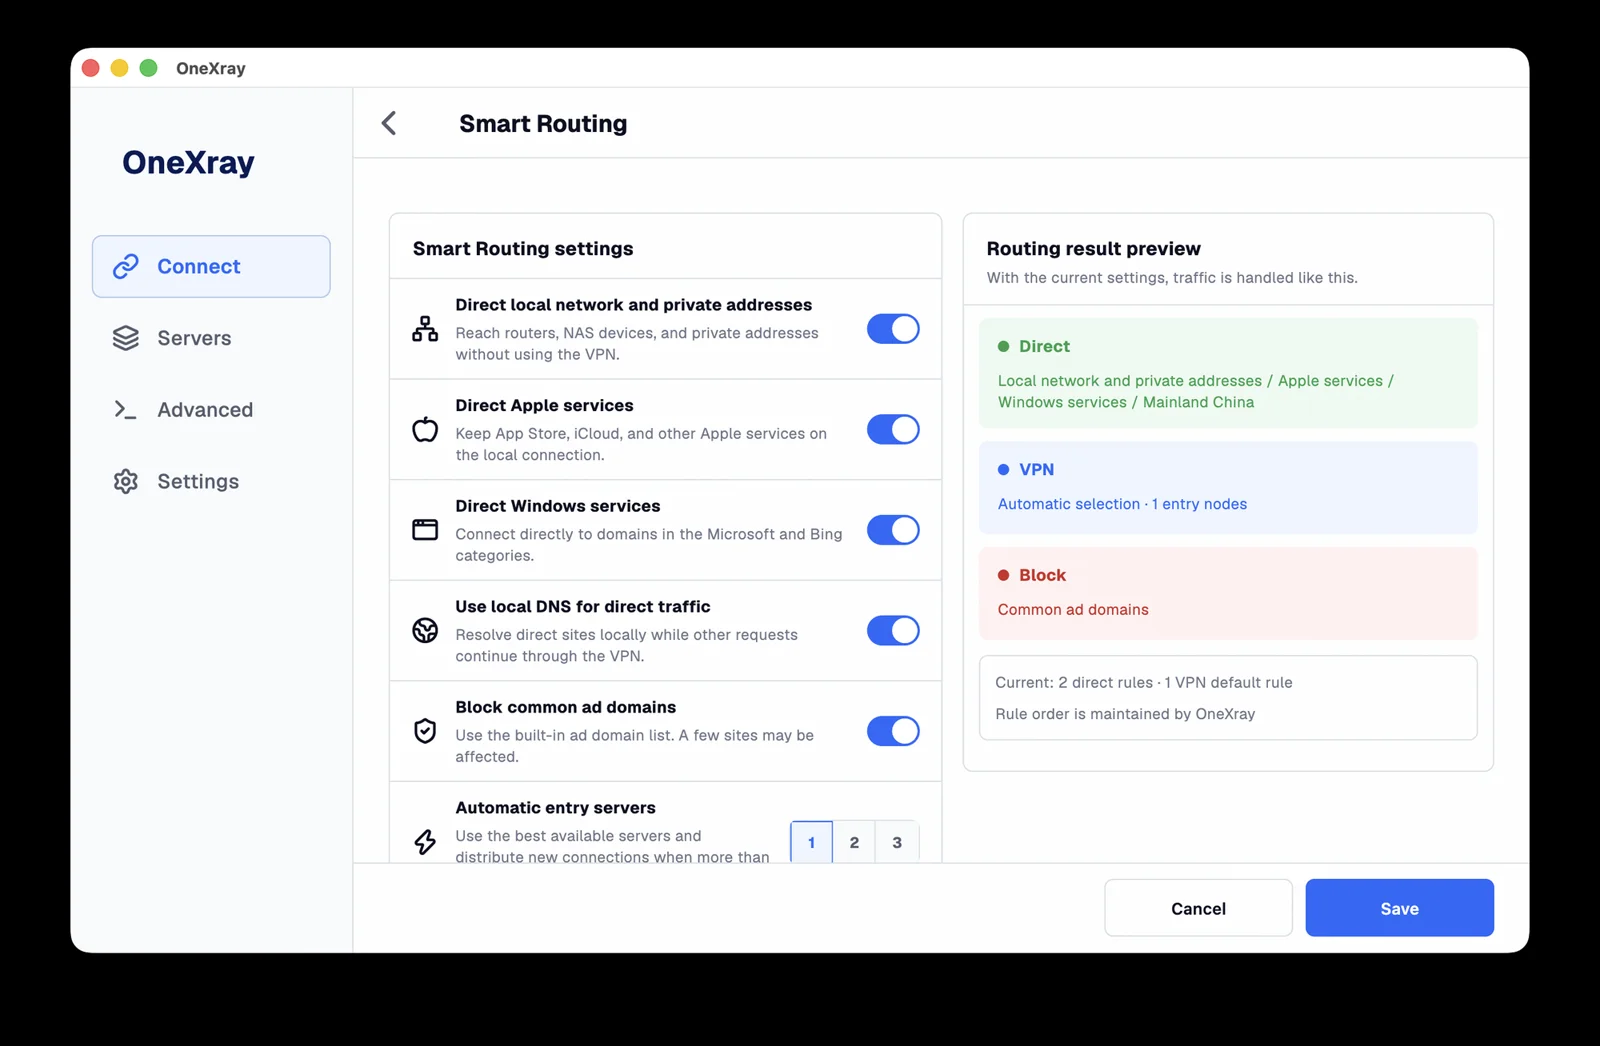
If the screen is in Russian: Подключение — Connect, Серверы — Servers, Расширенные — Advanced, Настройки — Settings, Умная маршрутизация — Smart Routing. The language is selected in the app settings.
Linux
Before installing, check the kernel and glibc requirements: the word "Linux" alone is not enough to guarantee package compatibility.
For Debian/Ubuntu, it is easier to use the DEB for your architecture. For example, for x86_64, the command from the downloads folder looks like this:
sudo apt install ./OneXray-linux-x86_64.deb
For ARM64, you need the file OneXray-linux-aarch64.deb.
The DEB installs dependencies and gives Core the network permissions it needs. ZIP requires separate preparation from the official installation kit; after replacing Core, its network capabilities must be granted again. If you do not want to set this up manually, choose a compatible DEB.
As on Windows, on Linux you need to explicitly choose the Xray outbound interface. Linux currently has no built-in backup section like the one described later for Apple, Android, and Windows.
2. First launch and system permissions
Step 1. Go through the initial setup
Read the privacy notice and continue. Wait while the local data is prepared.
Pay attention to the choice of country or region. In OneXray, it sets the sites and addresses that Smart Routing can send directly. This is not the choice of the VPN server's country.
On Windows and Linux, also choose the outbound network interface at this step.
Press the button to go to the main screen. The wizard itself does not add a subscription or connect the VPN.
Step 2. Allow the VPN to work
The permission request may appear when you enter the main interface, before you add any servers.
- iPhone / iPad / Mac: allow adding the VPN configuration. The device may ask for a passcode, Face ID, Touch ID, or the user password.
- Android: confirm the system VPN connection request. On Android 17 and later, you may also need to allow local network access.
- OneXraySE on Mac: additionally approve the network extension if macOS asks.
- Windows EXE/ZIP: confirm UAC when it is required to start Core.
If you refused by accident, add a subscription and try connecting again with the button. If the system sends you to its settings, do what it asks and try once more.
Step 3. Check the language
If the app opened in another language, find Settings → Language, choose English, and save. Server and subscription names are not translated when you change the language.
3. How the interface is organized
| Section | What it is for |
|---|---|
| Connect | Turning the VPN on, the selected server or configuration, routing, current traffic |
| Servers | Subscriptions, individual nodes, favorites, search, latency testing, and sorting |
| Advanced | VPN tunnel, platform system settings, Xray, tunnel DNS, Geodata, logs |
| Settings | Language, appearance, app information, supported backup features |
Expert mode on the connection page is for personal full Raw JSON configurations. You do not need to turn it on for a regular subscription or for choosing a Remnawave configuration.
4. How to add a 4TO subscription
Copy the right link
You need the personal connection link, not the address of the site's home page, account area, or payment page. Copy it in full, without extra spaces or a line break.
Open the add-subscription screen
- Go to Servers.
- Select +.
- Choose Add subscription.
- Enter the Subscription name, for example
4TO. - Paste the link into the Subscription link field.
Fill in the additional fields
| Field | What to choose for a regular setup |
|---|---|
| User-Agent (optional) | Leave the default unless 4TO gave you a different one |
| Subscription panel | Generic, unless you are specifically told to choose Remnawave |
| Configuration mode | By subscription format for the initial detection of the content type |
| Send device identifier (HWID) | Turn on if the subscription requires device binding |
| Age encryption | Do not configure without the provider's instructions |
Subscription panel and Configuration mode are different settings. Even if you choose "Generic", the app can recognize a received full Xray JSON and save it as a provider configuration.
What to do about HWID
If you see this message:
This provider requires a supported device identifier.
turn on Send device identifier (HWID) for this subscription and repeat the addition.
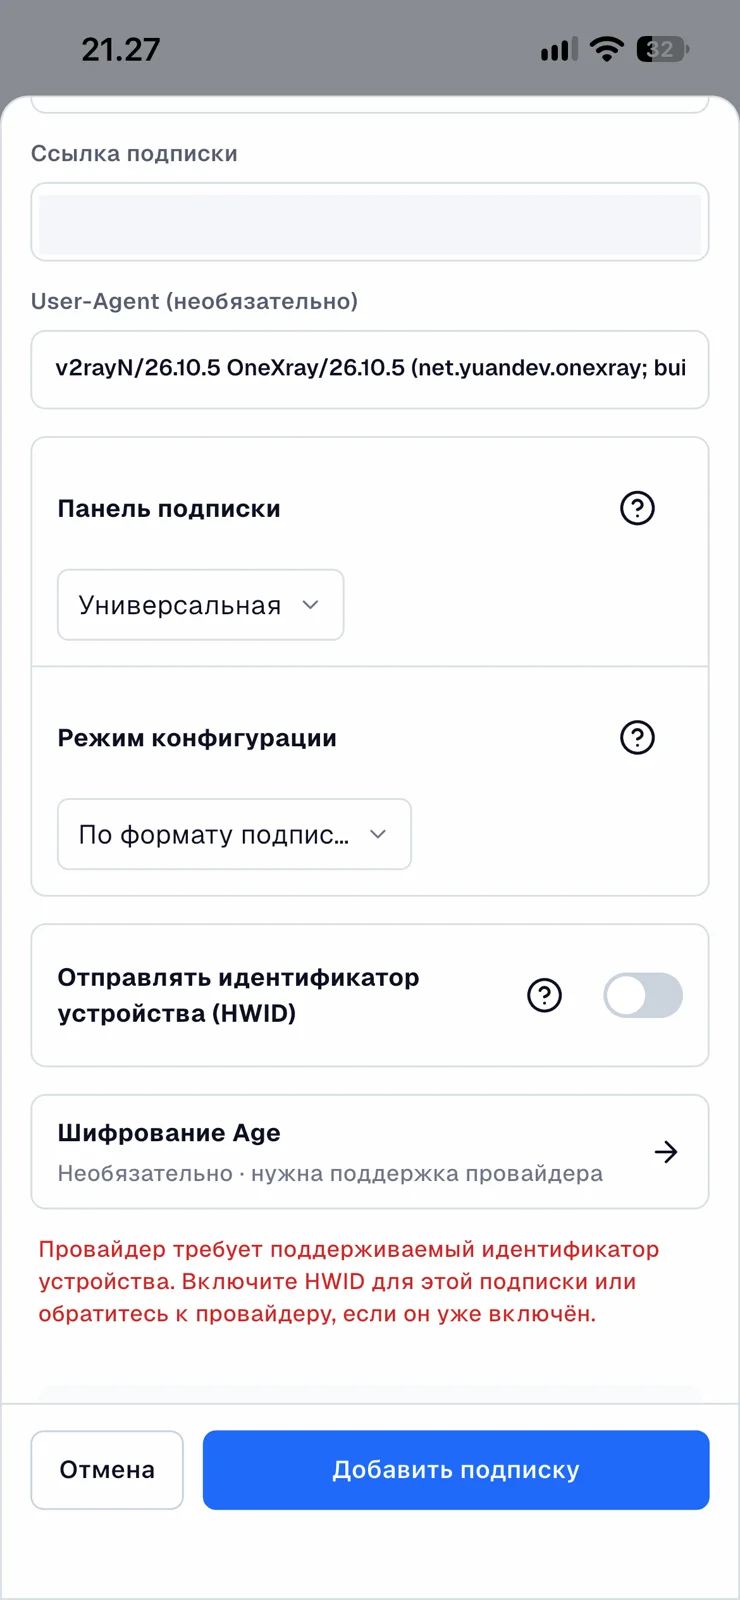
In the screenshot above, HWID is off, so the subscription reports an error. The switch you need should be turned on:
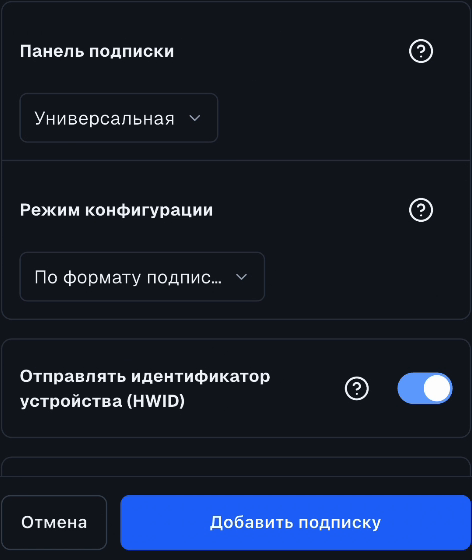
OneXray uses a random identifier for this subscription, not your phone's serial number. It is kept across regular app updates and when you turn the switch back on.
Turning HWID off or deleting the entry in the app does not by itself free the device on the service side. If you have reached the limit, check the device list in the service or contact support.
If HWID is already on and the error persists, check that the link is correct and that a device slot is available. Do not change other settings at random.
Finish adding
Select Add subscription and wait for the result. A source with your name and the received entries appears in the servers section.
For regular nodes, the latency test may continue even after the import. You do not need to add the subscription again just because the milliseconds did not appear right away.
Alternatives: link, file, and QR code
The add menu also offers importing links, a file, and a node's JSON. On iPhone, iPad, and Android, you can scan QR codes; the camera is requested when you pick this action.
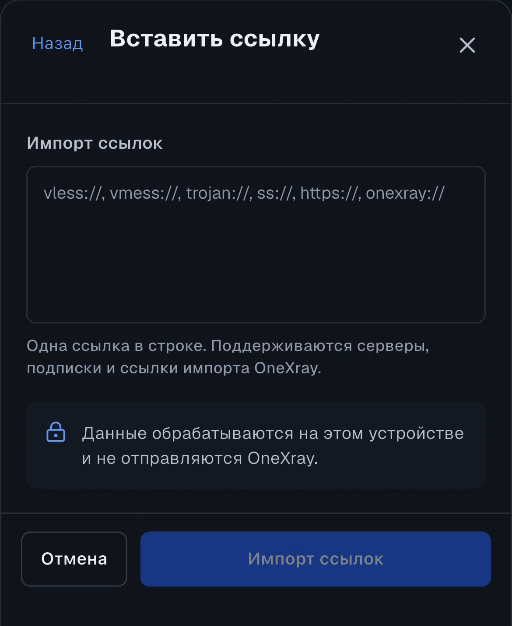
In Paste link mode, the app accepts supported node and subscription links. If you have several links, put each on a separate line. For a subscription with HWID, it is easier to open the Add subscription form directly so you can check all the fields.
A connection QR code can also contain access to your subscription. Do not post it next to the guide and do not send it to strangers.
5. Regular nodes and Remnawave configurations: what is the difference
After importing, first look at what exactly was loaded. Server choice, ping, and the available routing settings depend on it.
| What you see in the list | What it means | How to connect |
|---|---|---|
| Protocol/transport, for example VLESS and TLS; after a test, latency in ms | A regular node managed by OneXray | Choose a node or a suitable automatic selection; routing is configured in the app |
| A Remnawave label, a prompt to choose one configuration | A full provider configuration | Choose one entry manually; its DNS and routing are controlled by the configuration |
If Remnawave entries were loaded
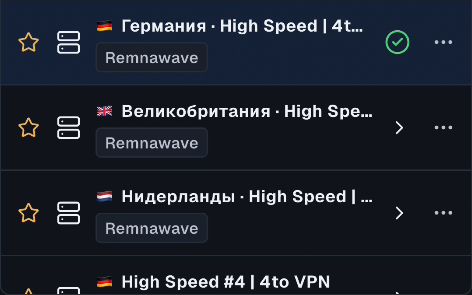
- Open your subscription in the Servers section.
- Select the specific entry for the country or destination you need.
- Make sure a selection mark appears next to it.
- Go back to Connect.
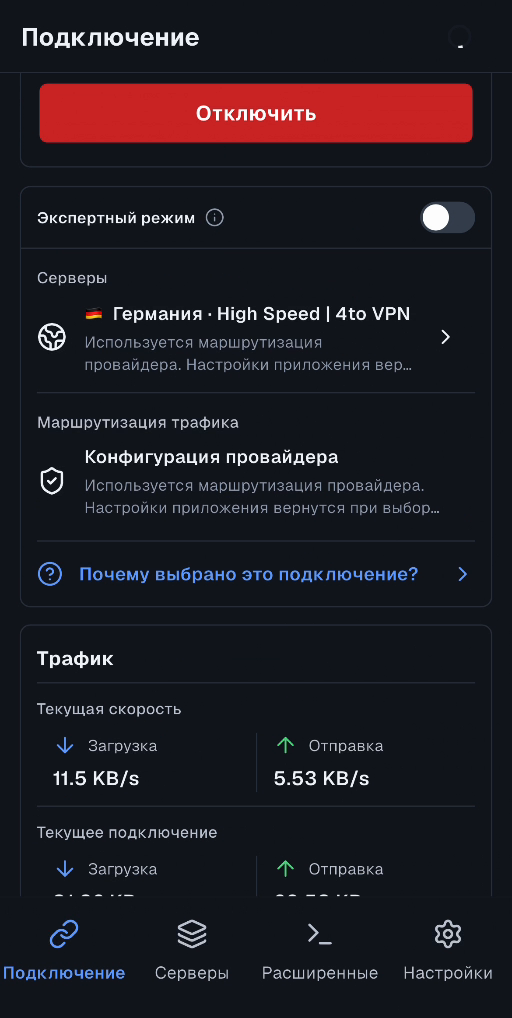
- Check that the Servers line shows the name of the selected configuration.
- Select Connect.
On the connection page, Provider configuration is shown in this case. This is normal: OneXray uses the rules, DNS, and chains from the received configuration.
To switch servers, open the subscription and choose a different full configuration. If the VPN is already running, confirm the reconnection if the app offers it.
Can you switch to "App-managed nodes"
In the subscription settings, you can choose Configuration mode → App-managed nodes. OneXray then uses its own rules for the available independent nodes from the cache.
But this changes how the connection works:
- The provider's full scheme, including its routing and DNS, stops being the selected way of working.
- A standalone node cannot always be extracted from a complex chain.
- If there is no suitable cache, you will need to refresh the subscription.
- After changing the mode, you may need to choose a compatible server again.
For a regular connection through ready-made 4TO configurations, keep the provider mode and choose the entry you need manually. Switch to app-managed nodes when you need your own rules and the subscription actually provides usable independent nodes.
6. How to choose a server and connect
One regular node
- Open Servers and your subscription.
- Select the node you need.
- Go back to Connect.
- Choose Smart Routing for everyday use or All via VPN for a simple check of the selected server.
- Select Connect.
A fixed single server stays a single entry server: choosing "2" or "3" in the automatic entry server options does not turn it into several servers.
Automatic selection of regular nodes
OneXray can choose automatically among suitable regular nodes, within a subscription or from your manual additions. This requires usable nodes with availability and latency test results.
If you have only one working entry, start with one entry server. Requesting two or three entry servers when there are not enough candidates can prevent the connection.
Updating the subscription or running a new test does not mean the working server is switched immediately. A configuration that is already running is not replaced silently.
Favorites, search, and manual groups
Use the star to move frequently used entries to favorites. Search helps you find the name you need in a large subscription.
In version 26.10.5, nodes you added manually can be organized into named groups and reordered. This only organizes the list: a manual group does not become a separate automatic connection pool. The mode that uses all manual servers still covers manual nodes from different groups.
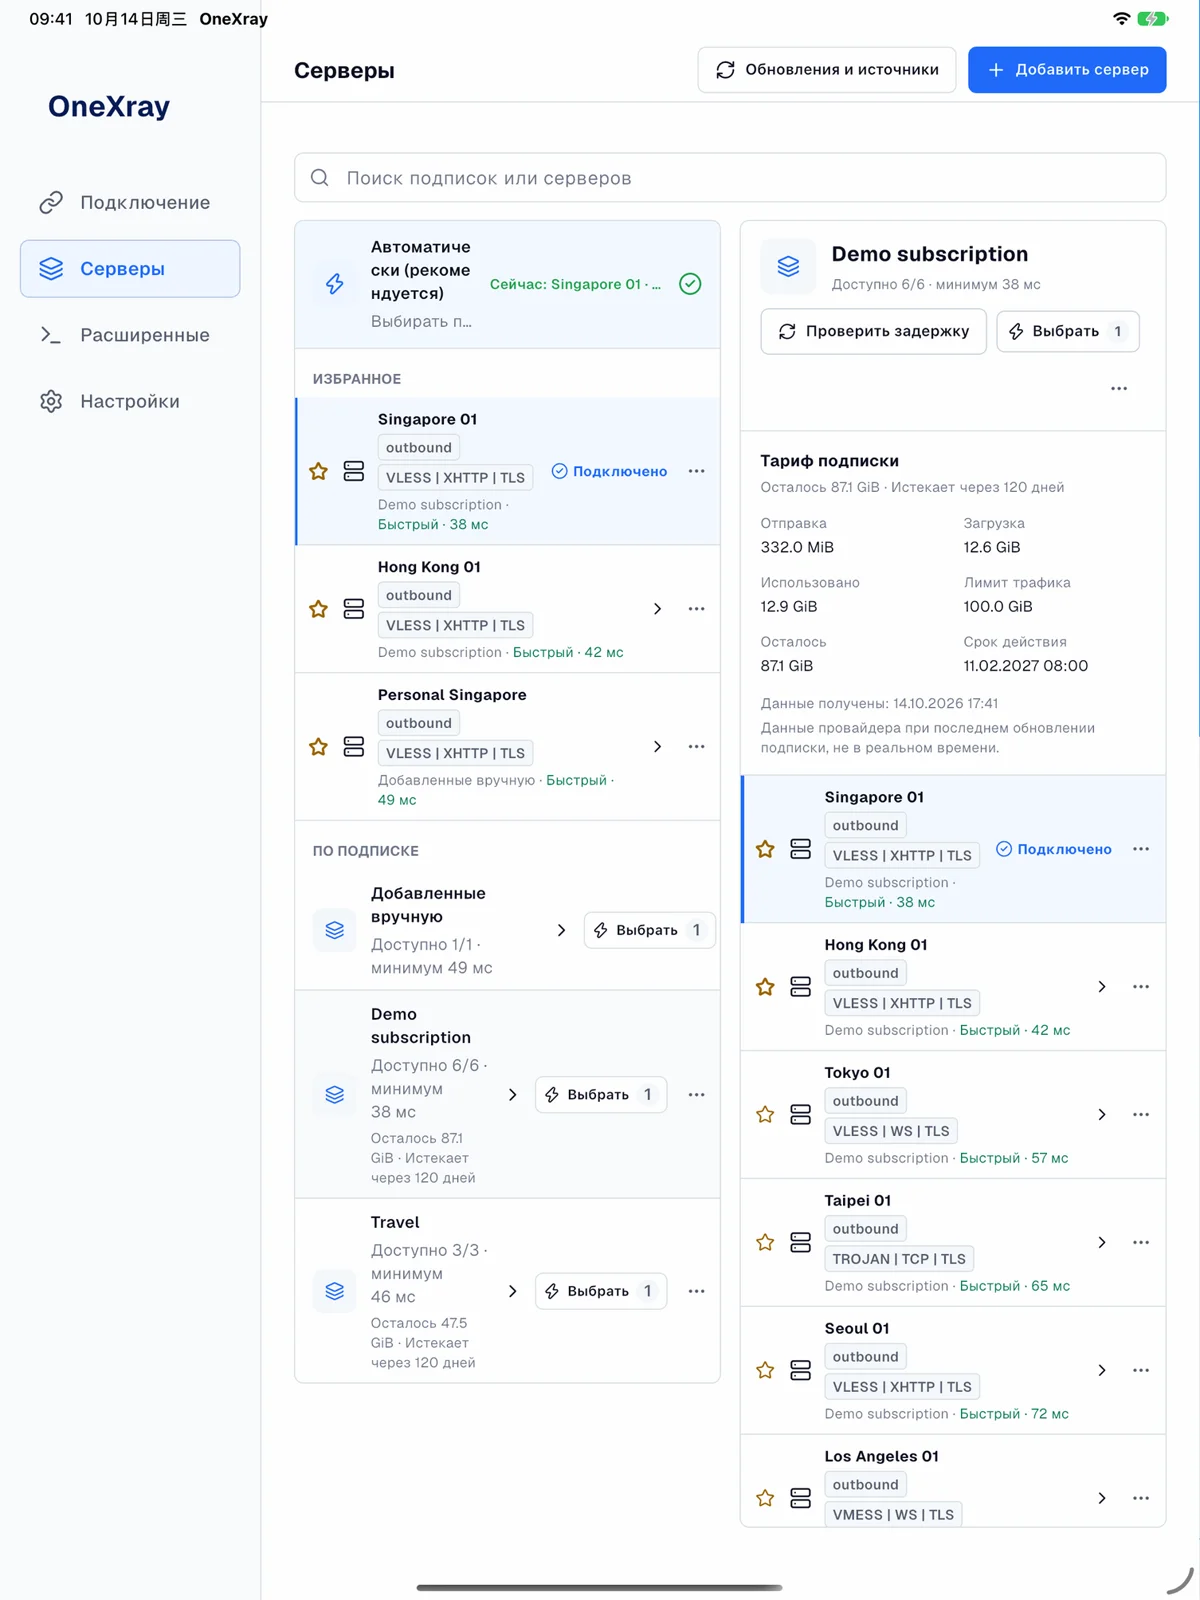
On a tablet or a wide window, the list of sources and the contents of the selected source can be visible at once:
How to make sure the VPN works
After connecting, check three things:
- The app shows the connected state and the Disconnect button.
- The server or configuration you intended is selected.
- The site or app you need actually opens.
The counters show the speed and volume of the current connection. Zero traffic at an idle moment is normal: open a page and see whether the values change.
7. How to see ping and check latency
In OneXray, the familiar word "ping" means a latency test of an HTTP request through a node. The app measures the time until the response headers are received. This is not an ICMP ping and not a download speed measurement.
Test all regular nodes in a subscription
- If possible, disconnect a running VPN first so it does not distort the path of the test request.
- Open Servers.
- Go into the regular subscription you need.
- Select Test servers in the subscription's actions block. You can also open the same command through ⋯ on a regular subscription.
- Wait for it to finish. Tests run in a queue, so a large list does not fill in instantly.
- Look at the ms values next to the nodes.
If the VPN is running, OneXray warns that it may affect the result. You can cancel or choose Continue test. Continuing the test does not turn off or switch the VPN by itself.
Retest a single node
- Open the subscription's node list.
- Select ⋯ to the right of the regular node you need.
- Choose Test again.
- Wait for the latency label to update.
If the node is labeled Remnawave, this item does not exist for a regular test — the reason is explained below.
Where to see the result
The result is shown in the node's label. For a selected regular node, it can also appear in the server card on the connection page.
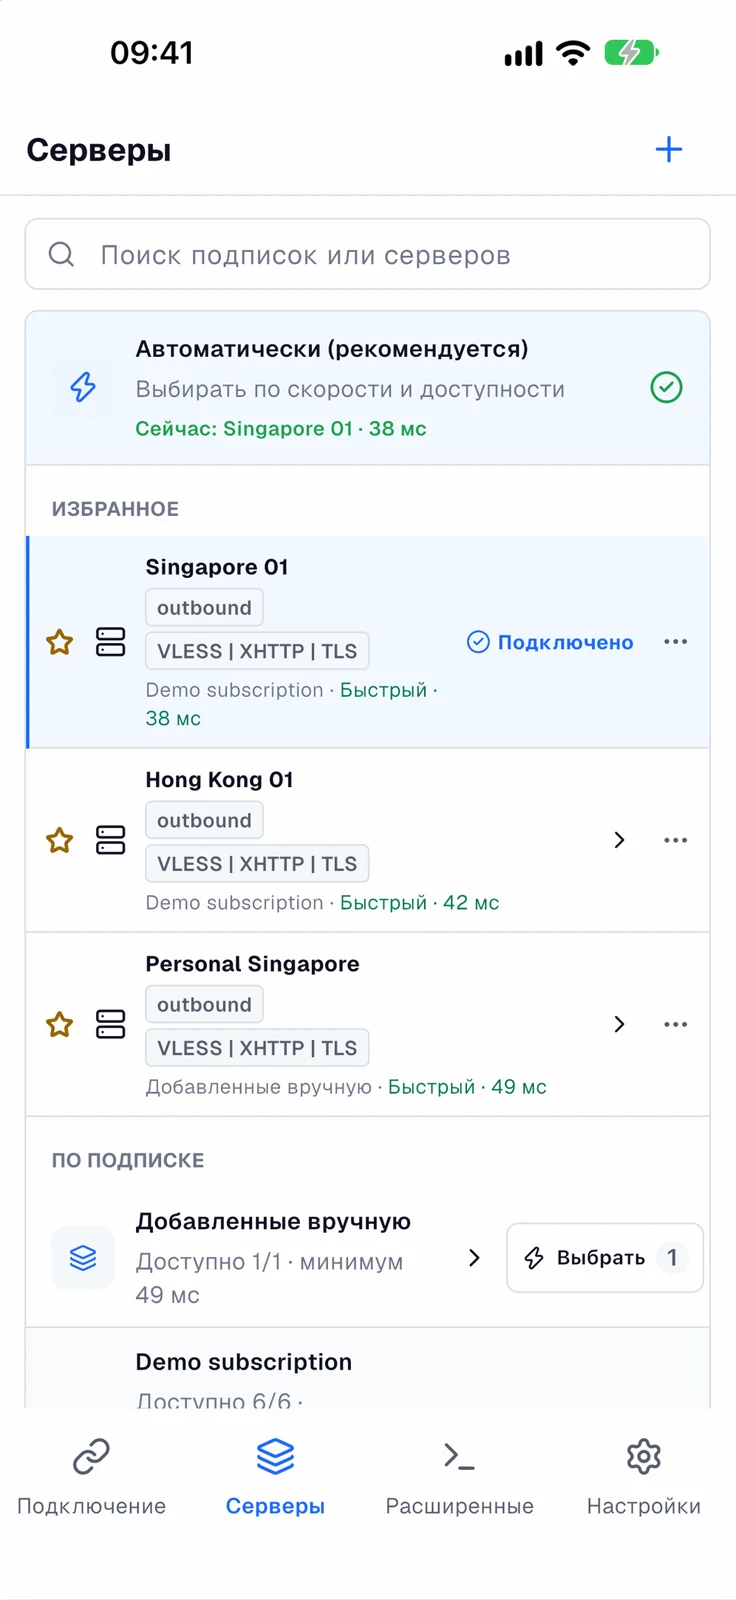
The current version uses the following labels:
| Result | Meaning in OneXray |
|---|---|
| Fast · … ms | A successful test with latency up to and including 500 ms |
| Slow · … ms | A successful test with latency above 500 and up to and including 1000 ms |
| Available · … ms | A successful test with latency above 1000 ms |
| No result | The node has not been tested yet, or the test has not finished |
| Error / timeout | The test request did not complete successfully |
These labels are the app's internal categories. For example, 400 ms may count as a "fast" result in the interface, but for calls and games that latency is still noticeable.
How to sort by ping
Open Servers, select the sort icon (an arrow with bars), and choose Latency.
Nodes with successful results come first, from lower latency to higher. Then come untested ones, failed ones, and full provider configurations.
How to change the test settings
Open Advanced → Xray → Speed test.
Here you can choose:
- A preset test address from Cloudflare or Google.
- Your own valid HTTP/HTTPS URL.
- A timeout from 3 to 8 seconds.
By default, Cloudflare and a timeout of 5 seconds are used. Changes apply to the next tests without reconnecting the VPN.
If all nodes suddenly time out, try a different preset test address. The problem may be the availability of the test site, not all servers at once. To compare servers, use the same address and the same network.
Why Remnawave has no ping
For such a list:
- Choose one configuration manually.
- Connect.
- Check that the sites and apps you need work.
- If the quality is not good enough, disconnect and try another configuration.
If you specifically need the built-in comparative node test, you need a suitable App-managed nodes mode with independent nodes. Switching to it is described above; it does not preserve the full routing approach of a full configuration.
If the provider built its own checks into the configuration, that configuration controls them. They do not automatically turn into regular ping values in the OneXray list.
"Lowest latency" while the VPN is running
This is a separate function for regular nodes in Smart Routing or custom routing.
If at least two active proxy routes are configured, you can choose Proxy selection → Lowest latency in the routing editor. The app tests the chains of the current connection and directs new proxy connections through the chain with the lowest measured latency.
The connection page then shows information about the active-chain tests. These results:
- Apply to the current connection, not to the whole subscription.
- Do not overwrite the results of the manual test of the server list.
- Do not move already open connections to another chain.
- Do not trigger a switch to a direct connection just because a test request failed.
With one entry server there is nothing to compare. For your first connection, keep one entry, make sure it works, and only then try several.
How to choose based on the results
Lower latency usually means a faster response, but it does not guarantee a high download speed or access to a specific service. Compare several available servers on your own network and check the scenario you need: video, calls, browsing, or file downloads.
8. Routing: which mode to choose
This section applies to regular nodes managed by OneXray. If the connection page shows Provider configuration, the provider's scheme is applied; the local Smart Routing and Custom Routing settings return when you choose compatible regular nodes.
| Mode | Behavior | When to use |
|---|---|---|
| Smart Routing | Selected local resources and categories go directly, all other traffic goes through the VPN | Everyday use |
| All via VPN | Internet traffic is sent through the selected node, with system exclusions respected | Checking a server and tasks that need an exit through the VPN |
| Custom Routing | Traffic is handled by your rules from top to bottom | Individual exceptions, your own domains and subnets |
To change the mode, open Connect → Traffic method and choose the option you need. Smart Routing and saved custom routes have a separate edit action.
If you are changing a running connection, save the settings and confirm the reconnection. During such a change, the old VPN is stopped first; if the new configuration fails to start, the previous connection is not restored automatically.
"All via VPN" and system exclusions
This mode does not override the operating system's settings. For example, an app excluded from the VPN on Android will keep bypassing the tunnel. Networks excluded by Apple or Windows system policy are also handled before the Xray rules.
If a specific app still goes direct, check the system exclusions, not only the mode on the connection page.
9. How to set up Smart Routing
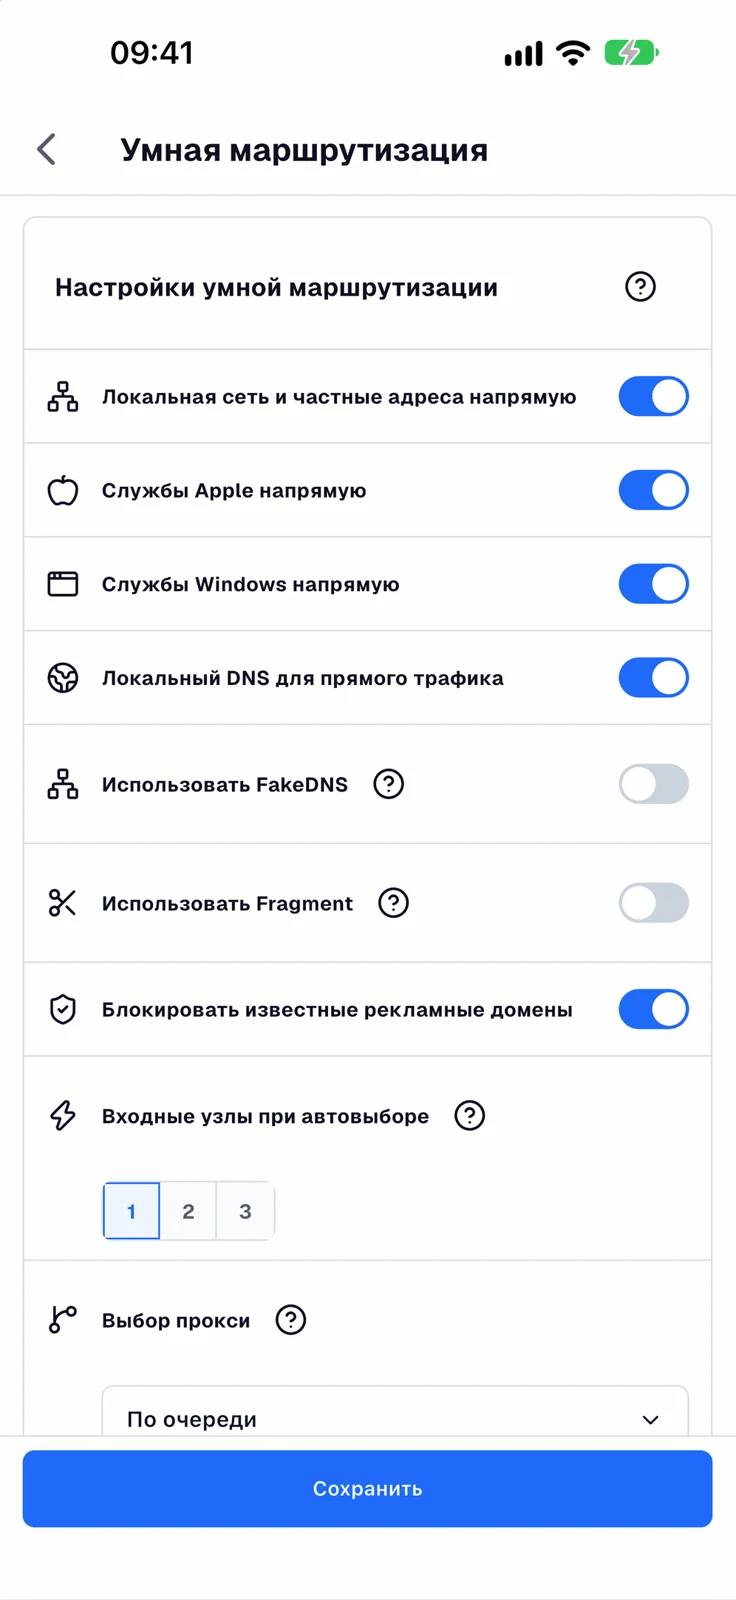
- Open Connect → Traffic method.
- Find Smart Routing and open its editor.
- Check the direct region and the switches.
- Select Save.
- Confirm the reconnection if the VPN is already running.
Direct region
The region sets the categories of domains and IPs that should bypass the VPN. Choose it for your task. For direct access to Russian resources, you need the corresponding region, not the country of the VPN server you selected.
The classification is based on GeoSite/GeoIP. It may be incomplete: a particular site sometimes needs its own rule.
Main switches
| Setting | What it does |
|---|---|
| Direct local network and private addresses | Lets you reach the router, NAS, and other local addresses directly |
| Direct Apple services | Sends suitable Apple services over the direct path |
| Direct Windows services | Sends Microsoft/Bing categories directly; the built-in GitHub rule takes priority and goes through the VPN |
| Use local DNS for direct traffic | Uses a separate direct DNS for suitable domains |
| Block common ad domains | Turns on blocking by built-in categories |
| Use FakeDNS | Uses virtual IPs to restore domains and for routing |
| Use Fragment | Turns on TLS handshake fragmentation in a supported scheme |
To start, leave FakeDNS and Fragment off. Turn on ad blocking if you like; if sign-in, payment, or a particular site breaks afterward, turn it off and check again.
Fragment can help on some networks, but it can increase connection time and does not guarantee access. It does not replace a working subscription or a compatible server.
How many entry servers to choose
For automatic selection or a group, you can set 1, 2, or 3 entry servers. This sets the available entries and how new connections are distributed, not a promise of a two- or three-fold speedup.
Start with 1. For several entries, first check that the selected source has enough suitable regular nodes.
In the Proxy selection field, Round robin and Lowest latency are available. The latter compares active chains, as described in the section about ping.
Final exit
In Smart Routing, you can add an optional final exit. The path then becomes: device → entry server → final exit → website.
For a regular connection, leave No additional exit (recommended). An additional chain requires compatible nodes, can increase latency, and is not needed for a standard subscription.
10. How to create your own rules for websites
For form-based rules, use a normal configuration, not advanced JSON.
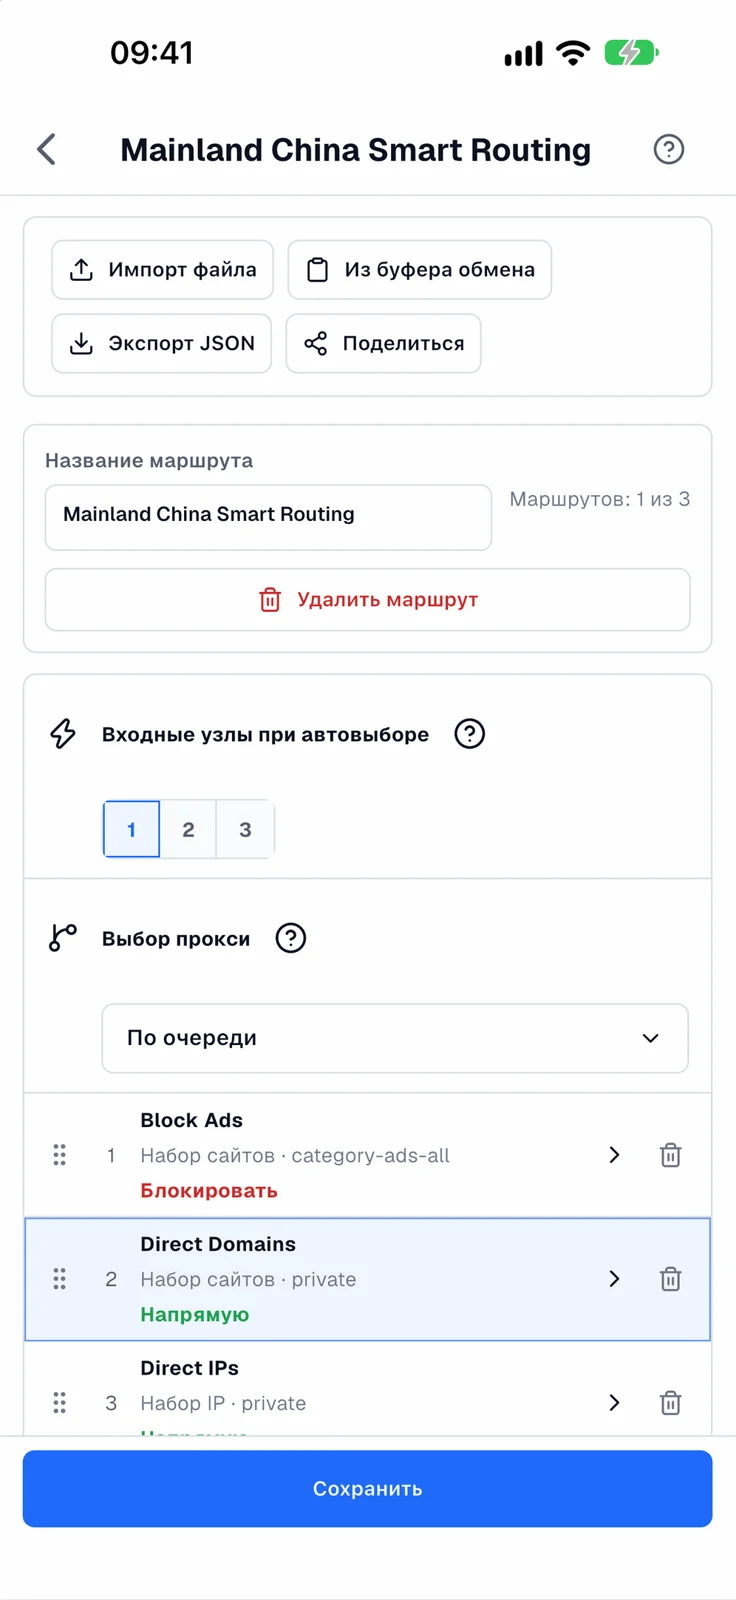
- Open Connect → Traffic method.
- In the Custom Routing section, select New custom route.
- Choose Normal configuration.
- Enter a clear, unique name, for example
My rules. - Leave one entry server for the first test.
- Select Add rule.
- Specify the condition and the action.
- Save the rule, then be sure to save the entire route with the button at the bottom.
- Choose the route you created on the connection page.
In the app, you can create up to three custom routes in total, counting both the normal and advanced types. The actual servers are chosen separately on the connection page.
Example: one site direct, everything else through the VPN
Suppose the site example.com should open directly. Here it is a placeholder domain: replace it with your own.
In a new rule, set:
| Field | Value |
|---|---|
| Rule name | This site direct |
| Websites and domains | domain:example.com |
| Other conditions | Leave empty |
| Then | Direct |
Save the rule and the entire route. With this rule, the chosen domain and its subdomains go directly; if nothing else matches, the regular route uses its standard proxy path.
To force the same domain through the VPN, choose the action Use VPN. To block it, choose Block.
How to write domains
| Entry | What it means |
|---|---|
domain:example.com |
The domain and its subdomains |
full:login.example.com |
Only the exact name login.example.com |
geosite:CATEGORY |
A domain category from the installed GeoSite; choose an existing suggestion |
Do not paste the full page URL with https://, a path, and parameters into the domain condition field. The rule needs a domain in a supported format.
A string without a prefix may mean a keyword search. For a predictable rule, use domain: or full:.
Example: local subnet direct
For a separate subnet, create a different rule:
- Name:
Local network. - The IP addresses or ranges field: the subnet you need, for example
192.168.1.0/24. - Action: Direct.
This example only applies when your network actually uses that subnet. If you need access by internal names, check DNS separately.
Why rule order matters
Rules are checked from top to bottom. The first matching one applies.
For example, an exception for a specific domain must sit above a more general rule that already covers that domain. On a computer, change the order by dragging; on a phone, use the move handle in the list. After the change, save the entire route.
A common mistake: domain and IP in one rule
If you need "this domain or this subnet", create two separate rules. The values within a single regular domain list can be used as alternatives.
11. How to exclude apps from the VPN on Android
On Android, there is a separate choice of which apps go into the tunnel.
Open Advanced → VPN tunnel → Android system VPN → VPN app scope.
| Mode | How it works |
|---|---|
| All apps | All eligible apps go through the tunnel |
| Only selected apps | Only the marked apps go into the tunnel |
| All except selected apps | The marked apps bypass the tunnel |
Exclude a banking app
- Choose All except selected apps.
- Find the app by name.
- Mark it in the exclusion list.
- Save your changes.
- Reconnect the VPN.
- Fully close and reopen the excluded app.
Keep the VPN for the browser only
- Choose Only selected apps.
- Mark the browser you need.
- Save the selection and reconnect.
This mode requires at least one installed app. An empty list does not mean "all apps".
The include and exclude lists are saved separately. When you switch modes, check which apps are marked: the old selection from the other mode does not necessarily disappear.
App selection determines what enters the tunnel. Smart Routing or custom rules then decide how to handle that traffic. That is why an app in "Only selected apps" mode can still reach some sites directly under the route rules.
On iPhone and iPad, OneXray has no equivalent regular app list. For these devices, use the supported domain, network, and system settings.
12. DNS, FakeDNS, and tunnel settings
Which DNS settings exist
OneXray has several different levels of DNS:
| Setting | What it is for |
|---|---|
| Proxy DNS in the route | DNS queries over the proxy path |
| Direct DNS in the route | Domain resolution for direct rules |
| Tunnel DNS in the advanced settings | Platform tunnel parameters |
| DNS of a full provider configuration | The scheme from the received full Xray JSON |
If internal names of your home or work network do not open, start with the route's local DNS. For example, you may need your router's or your organization's DNS. Changing only the tunnel DNS does not replace this setting.
In regular Smart Routing and custom routing, you can set a primary and fallback DNS, as well as caching. Keep the working defaults unless you have a specific task or a diagnosed problem.
When you need FakeDNS
FakeDNS helps restore domain names for rules by using virtual IPs. It is an additional mechanism, not a universal fix for the internet.
In current regular routes it is off by default. If you turn it on, do not turn off the traffic analysis it requires: the interface has related restrictions.
After the VPN is stopped or restarted, the browser and the system may keep old DNS responses for a while. If the problem started after you changed FakeDNS, restore the previous value, reconnect, and reopen the app. Sometimes you need to refresh the network connection to get fresh DNS responses.
Do not change several settings at once
If the connection already works, change one setting at a time and check the result. Changing DNS, FakeDNS, Fragment, IPv6, and the route all at once makes it much harder to find the cause of a failure.
If you were given a separate full Xray JSON
A full configuration file and a single node's JSON are imported in different ways. For a separate full Xray JSON, open Connect, turn on Expert mode, go to the Raw JSON selection, and select Add Raw JSON. Enter a name, import the file or paste the contents using the clipboard action, then save and choose the configuration.
A personal Raw configuration sets its own servers, DNS, and routing. It is not merged automatically with the selected regular nodes or Smart Routing rules. A successful save validates the configuration but does not guarantee that its servers are reachable.
You can add up to three personal Raw configurations. Remnawave entries received inside a subscription do not count toward this limit and are chosen without Expert mode. Do not copy them into Raw just to connect: such a personal copy is detached from subscription updates.
13. iPhone, iPad, Mac, and Windows specifics
Apple: connect on demand
The settings are in Advanced → VPN tunnel → Apple system VPN.
You can set automatic behavior for Wi-Fi networks: connect on some and disconnect on others. Enter the exact network name — the SSID. One network must not be in both lists at once.
For cellular on iPhone and Ethernet on Mac, the corresponding system actions are available. Save the settings and check the transition between networks.
This is an on-demand connection mechanism, not a guarantee of an uninterrupted tunnel under all conditions.
Apple: "Capture all traffic"
This is a system tunnel setting, separate from the All via VPN mode on the connection page. It changes what the operating system passes into the tunnel.
When it is on, the supported system exclusions are available. Without a specific need, leave the defaults: a wrong combination can affect the internet, local devices, and system services.
With full capture off, you can set networks to bypass the VPN. Such exclusions take effect before the Xray rules and do not configure DNS for internal names automatically.
iPhone / iPad: hiding the VPN icon
The Apple system settings have a Hide VPN icon option. It is off by default and works through quirks of system routing. The result depends on the iOS/iPadOS version and may affect switching between networks.
For your first connection, leave it off. The presence or absence of the icon in the status bar does not replace checking the status in the app.
Computers: closing the window and quitting
Closing the window usually hides OneXray. It is not the same as disconnecting the tunnel.
- On Mac, a regular quit may leave the VPN running. To stop it, use the disconnect button or the quit command that also stops the VPN.
- In Windows Store/MSIX, a regular quit may also leave the system VPN active.
- In Windows EXE/ZIP, the quit command stops the VPN.
If your goal is to disconnect for certain, first select Disconnect and check the result.
14. How to update a subscription and see its expiration
Update manually
- Open Servers.
- Select ⋯ on your subscription.
- Choose Check for updates.
- Wait for the result.
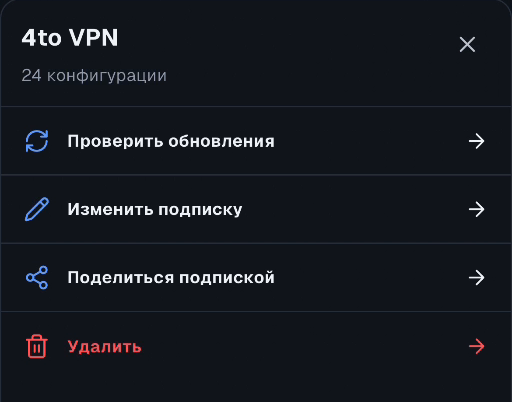
Check for updates downloads the subscription contents. Test servers tests regular nodes. These are different actions. The menu of a full provider configuration has no regular latency test.
Change the link or HWID
Open ⋯ → Edit subscription, fix the field you need, and save. Then run Check for updates to fetch data with the new settings.
Saving the form does not by itself mean that the nodes have been reloaded. A running connection also does not have to switch immediately.
See traffic and expiration
If the provider supplies this information, the subscription card shows used and remaining traffic, the limit, and the expiration date.
This is information as of the last subscription update, not a real-time counter. To refresh it, update the subscription. If the field is missing or says "Not provided", you cannot conclude that the plan is unlimited.
Do not confuse these values with the statistics of the current connection on the main screen.
Automatic updates
Open Advanced → Xray → Data updates. Subscriptions and Geodata have separate switches and intervals: 1 day, 3 days, or a week.
Automatic subscription updates do not require a running VPN. Automatic Geodata updates run while the VPN is connected. If the app is closed or suspended, running exactly on time is not guaranteed.
A failed update should not replace working data with an empty list. If an error appears, first work out its cause while keeping the existing entry.
App update
OneXray itself is updated separately from subscriptions and Geodata: through the store or with a new official package. Version information is in the About OneXray section.
When upgrading from much older versions, keep in mind the interface change: the current four sections appeared in version 26.9.1. Old instructions with Home, Profile screens and a separate Direct mode may no longer apply.
15. What Geodata is and when to update it
Geodata is a set of databases of domain and IP categories for routing. They do not contain your subscription and do not replace VPN servers.
The section is in Advanced → Xray → Routing data (Geodata). The standard GeoSite and GeoIP files are updated together.
Updating is useful if a category you need has changed or your rules use an outdated classification. But it will not fix an expired subscription, a wrong HWID, or a missing VPN permission.
If a configuration refers to your own data file that is not on the device, you need to get it before starting that configuration. OneXray does not delete the missing rule and does not download it silently at the moment of connection.
If the source is unreachable without a VPN, use another working configuration to download it, then return to the one you need.
16. Backup and moving to another device
On supported platforms, open Settings → Data → Backup & restore.
| Platform | Where you can save |
|---|---|
| iPhone, iPad, Mac | iCloud Drive or a file chosen through the system dialog |
| Android | A file through the system document picker; a cloud provider if it is available in that dialog |
| Windows | A folder synced by OneDrive |
| Linux | This built-in section is currently unavailable |
Create a backup
- Choose the storage location and file.
- If the file is empty, the app creates the first backup.
- If it already has content, choose carefully between restoring and overwriting.
- Check that the save succeeded.
- If you are moving to another device, make sure the file is available and readable there.
Usually the file OneXray-backup.json is used. Later writes replace its contents: this is not a version history and not an automatic merge of settings from different devices.
Restore
- Open restore and choose the backup file.
- Look at the preview.
- Confirm the replacement only after checking: restoring replaces the managed configurations rather than merging them.
- Update the restored subscriptions to download servers.
- Choose the server or configuration again and check routing.
- Grant the required permissions on the new device and connect manually.
The subscription node cache is not included in the backup. For Remnawave configurations, this also means you need to update the subscription after restoring. Ping results, the current connection selection, and device permissions are also not carried over as a ready, working session.
Automatic backups have their own interval of 1, 3, or 7 days. It does not depend on Geodata updates and does not require a connected VPN, but the app must get a chance to run the schedule check.
17. Common problems
"This provider requires a supported device identifier"
Turn on HWID for the subscription in question. If the entry has already been created, save the change and run Check for updates. If the message remains, check the device limit and contact support with the text of the error, with your link hidden.
"Device limit" or a registration error
Check the devices on the service side. Deleting and adding the subscription again can only increase the number of registrations. Turning HWID off does not delete the existing entry with the provider.
"No available entry servers" even though servers are visible
First look at the list labels:
- If it says Remnawave, choose one configuration manually instead of the general automatic selection.
- If these are regular nodes, wait for the latency test or run it manually.
- Check that the selected source contains working regular nodes.
- Reduce the number of entry servers to 1 if there are few suitable candidates.
Servers have no ping values
For regular nodes, run Test servers, wait for the queue, and, if needed, change the test address in Advanced → Xray → Speed test.
For full Remnawave configurations, the absence of regular ping is expected. They are checked by connecting to the selected entry, as described in the separate section.
The subscription does not load or the list is empty
- Check that you pasted the whole personal connection link.
- Check the subscription's expiration and availability in the service.
- Make sure HWID is on if it is required.
- Restore the default User-Agent if you changed it without the provider's instructions.
- Check that the panel and mode match the subscription format.
- Retry the update on a different network or through another available working connection.
OneXray does not convert arbitrary configurations from other clients. For example, a ready-made sing-box JSON cannot be considered a compatible Xray JSON just because the file extension is the same.
"No cached configurations for this mode" after changing the mode
Refresh the subscription. If there is still no suitable data for the mode, return to the original mode or request a compatible format. Do not try to take apart a complex provider chain by deleting its dependencies.
The VPN is connected, but the site I need does not open
- Check the internet with the VPN off.
- Try a different server or a different full configuration.
- For a regular node, temporarily check All via VPN.
- Check app exclusions on Android and excluded networks in the system settings.
- If you turned on ad blocking, FakeDNS, or Fragment, restore the previous values one at a time.
- If the problem involves internal names, check the route's local DNS.
In provider mode, do not look for a fix in the inactive Smart Routing switches: the connection uses the received configuration.
The tunnel does not start on Windows or Linux
Check the Xray outbound interface. After an adapter change, the saved interface may have disappeared. For Windows EXE/ZIP, also check whether UAC was confirmed; for Linux, check that the package is installed correctly and that Core has its network permissions.
Android turns off the VPN after the screen locks
Check OneXray's background restrictions in your phone's settings. On some firmware, you need to allow background activity and remove the strict battery restriction for the app. Section names depend on the manufacturer.
Also make sure that another VPN or the system always-on VPN mode does not conflict with OneXray. After changing the settings, connect from the app and check that it works after the screen locks.
Geodata file not found
Open Advanced → Xray → Routing data (Geodata), download the missing source, and start again. Restoring from a backup brings back the source information, but not necessarily the files themselves.
The connection disappeared after changing settings
When you reconnect, the previous VPN is stopped first. If the new start failed with an error, read the error and fix the cause, or manually choose the previous working settings and connect again.
18. What to send to support
To help find the cause faster, prepare:
- Device model and OS version.
- OneXray version.
- Installation type on Windows or Mac, if relevant to the error.
- The exact text of the error.
- At which step the problem occurs: subscription loading, HWID, node selection, connecting, or opening a particular service.
- Network type: Wi-Fi or mobile data.
- The type of entries received: regular nodes or Remnawave.
- The latency test result, if it is available for this type of entry.
If needed, logs are in Advanced → Xray. In OneXraySE for macOS, the file logs section is hidden.
Recommended order for your first connection
- Install OneXray from an official source.
- Go through the initial setup and grant the system permissions.
- On Windows/Linux, choose the outbound interface.
- Add your personal subscription and turn on HWID if it is required.
- If the entries are labeled Remnawave, choose one configuration manually and connect.
- If these are regular nodes, wait for the latency test, choose one node, and start with one entry.
- Check the sites you need, then configure routing and exclusions if necessary.