
Karing: the detailed guide to installation, subscriptions and VPN setup
Karing is a client for connecting with your own subscription. It lets you choose servers, switch automatically between available servers, and set which sites open through the VPN and which go directly.
This guide covers installation on iPhone, iPad, Android, Windows, macOS, Linux, and TVs, adding your 4TO subscription, sending your HWID, choosing a server, routing, DNS, backups, and common errors.
Last updated: October 28, 2026. The instructions and the Russian item names were checked against stable version 1.2.25.2802. The screenshots show the real Karing interface on iPhone. Personal fields are blacked out; enter your own data. Button positions on other devices may differ.
The app itself does not create paid access automatically. You need an active subscription; having Karing on your device and having servers are separate things.
Contents
- Where to download Karing and which build to choose
- iPhone and iPad: installation and first connection
- How to add your 4TO subscription
- Choosing a server, checking latency, and connecting
- Android: installation and background operation
- Windows: installation, system proxy, and TUN
- macOS: installation and network extension
- Linux: packages and first connection
- Apple TV: transferring the configuration from your phone
- Android TV and Google TV
- Rule and Global modes
- Routing: how Karing rules work
- Android: choosing apps for the VPN
- Process rules on a computer
- Custom Auto Select
- DNS: how not to break a working configuration
- Updating the subscription, the app, and autostart
- Backups and moving your settings
- Checking the route and diagnostics
- Common problems and solutions
- Quick answers
Where to download Karing and which build to choose
Use the official Karing download page. It has options for all supported platforms. For iPhone, iPad, and Apple TV, there is the Karing page in the App Store.
For a regular connection, choose the Stable version. TestFlight and Beta are meant for testing: you do not need to install them just to add a subscription.
| Device | What to choose | Requirements and notes |
|---|---|---|
| iPhone, iPad | Karing from the App Store | iOS / iPadOS 15 or later |
| Android phone or tablet | Android APK | Android 8 or later; ARM64 or ARMv7 |
| Windows | windows_x64.exe installer or ZIP |
Windows 10/11, 64-bit system |
| Mac | macOS build, DMG or PKG | macOS 12 or later; Intel and Apple Silicon |
| Linux | DEB, RPM, or AppImage from the official release | In the verified release, x86-64; compatibility depends on your distribution’s libraries |
| Apple TV | Karing from the App Store on the TV | tvOS 17 or later; the configuration is first transferred from mobile Karing |
| Android TV / Google TV | Android TV APK from the official page | Choose the Android TV section specifically, if it is available for your box |
In the verified stable release, the Windows and Linux packages are built for x64 / amd64. Do not choose them as native ARM64 builds. The amd64 label also suits ordinary 64-bit Intel processors.
The Android file ending in arm64-v8a.apk suits most modern phones. armeabi-v7a.apk is for a 32-bit ARM system. android_arm.apk combines the supported ARM variants and is convenient if you do not know the architecture. On a box with a 64-bit processor, Android may be 32-bit.
Files named Source code, checksums, and other service files of the release are not installed in place of the app.
iPhone and iPad: installation and first connection
1. Install the app
- Open the Karing page in the App Store.
- Check the name Karing and the developer Supernova Nebula LLC.
- Tap Get, or the cloud icon if you have installed the app before.
- Wait for the installation to finish and tap Open.
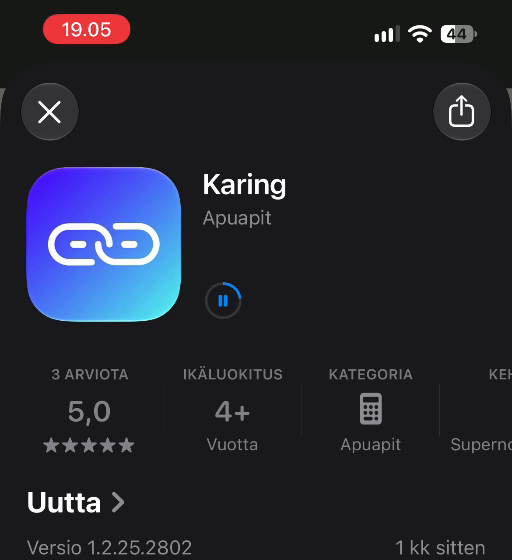
If the app is not available for your account, first check your App Store region. The steps for changing the region are described in a separate guide.1 The store region and the country you later choose inside Karing are set separately.
2. Complete the initial setup
- Read the notices and terms on first launch, then continue.
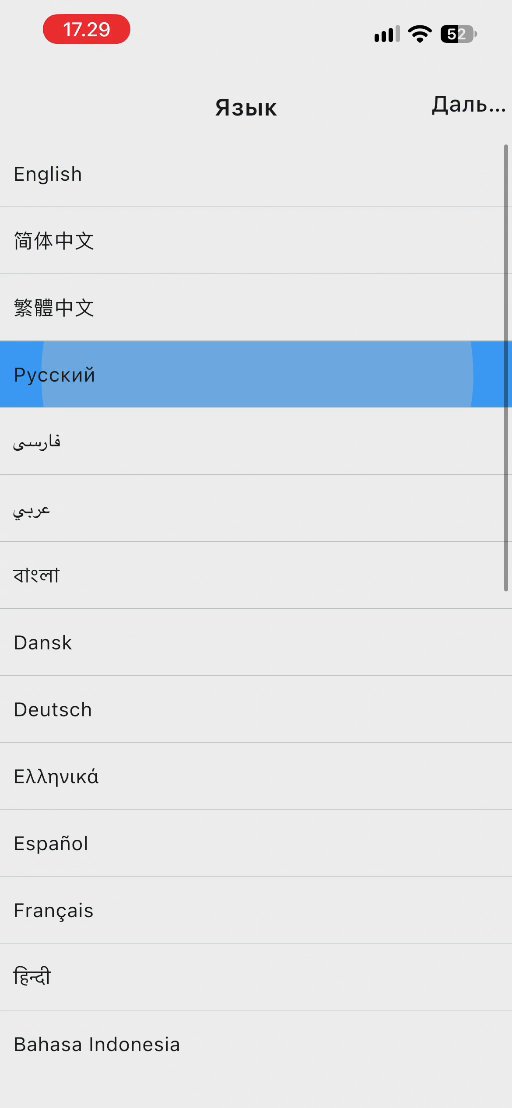
- On the Language screen, choose Русский (Russian).
- Tap Next in the top right corner.
- On the Country Or Region screen, choose the country where you actually use the connection. For a user in Russia, choose Russia.
- Continue with the setup of presets and the interface mode.
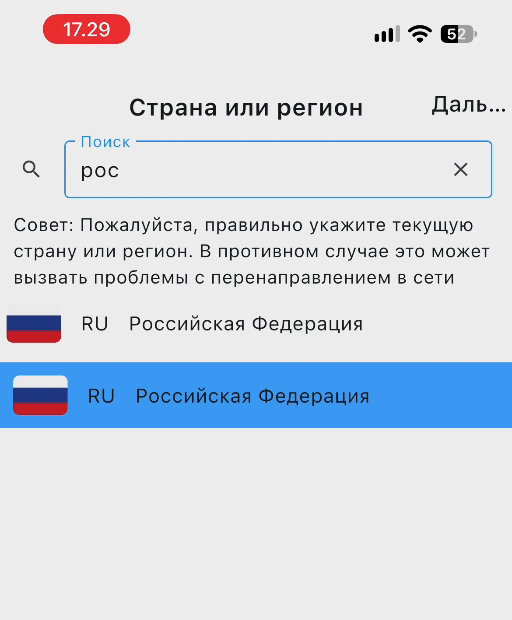
The country inside Karing helps select the initial rules. It does not choose the country of the VPN server. You choose the exit location later in the server list.
3. Decide on presets and Novice Mode
On the Preset [Custom Diversion Group] screen, you can turn on ready-made rules for individual services. The label to the right of each name shows the action: Direct, Current Selected, or Block.
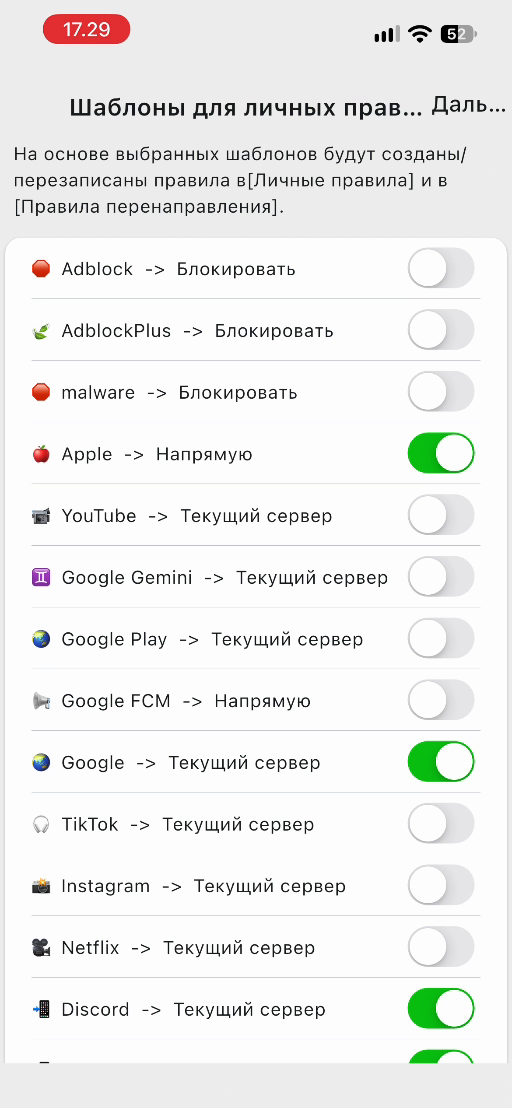
You do not have to turn on every preset. A clear basic scheme is enough for the first connection. You can add the exceptions you need separately later. Applying the presets again may overwrite custom rules with the same names — save a backup before doing so.
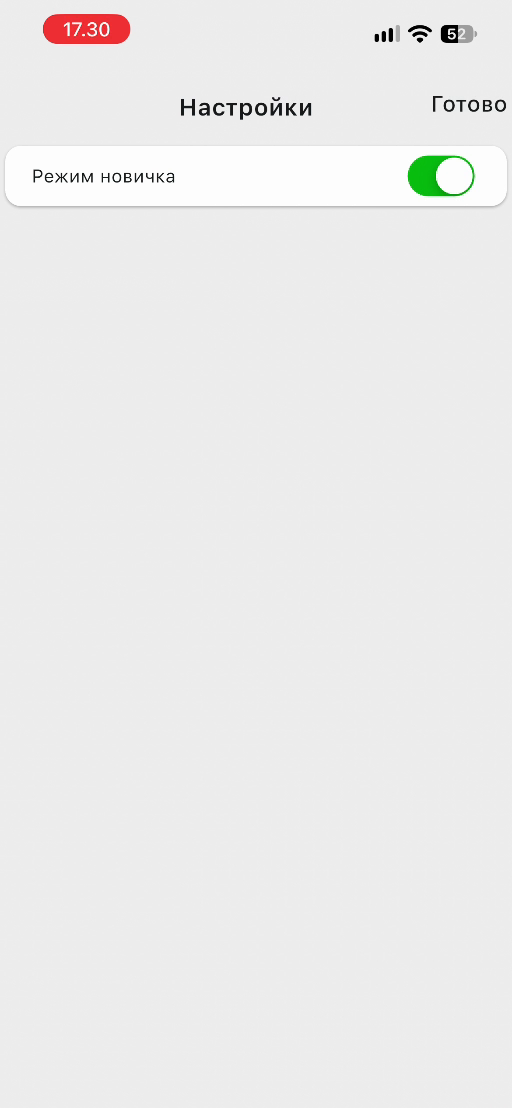
Novice Mode simplifies the interface and hides some of the advanced options. You can leave it on for a regular connection. For the detailed setup described in the routing section, first open Settings and turn off Novice Mode if the items you need are missing.
4. Add the subscription and allow the VPN
Add the link following the instructions in the next section and choose a server. Then, on the home screen, tap the round connect button with the shield icon.
The first time you do this, iOS will ask you to allow Karing to add a VPN configuration. Tap Allow. The system may ask for Face ID, Touch ID, or the passcode of the iPhone itself — confirm the action on your own device.
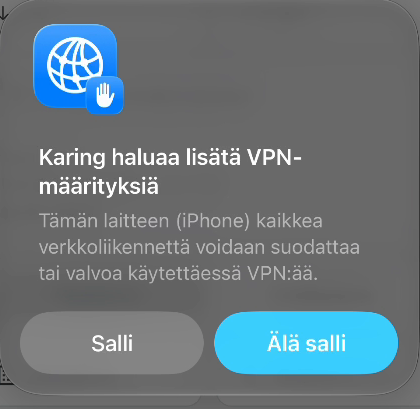
Do not enter the iPhone passcode in Karing’s Decrypt Password field. These are different mechanisms. The VPN permission is confirmed in the system dialog, while the decryption field is needed only for a specially encrypted configuration, if the service issued a separate password for it.
In the usual scenario, leave Settings → TUN → TUN Mode turned on. On iOS, turning TUN off while the network extension is running may leave you without internet.
How to add your 4TO subscription
Karing supports several subscription formats: Clash, a number of Clash.Meta configurations, Sing-box, V2Ray, and other compatible variants. If the access page offers a choice of client, use the Karing option. Compatibility of individual advanced parameters depends on the format and the app version.
Method 1: the add button on the subscription page
- Open your 4TO subscription page.
- In the device connection block, choose your system and the Karing client.
- Install the app if you have not done so yet.
- Tap the button for adding the subscription in Karing.
- If the browser asks, allow it to open the app.
- Check the fields of the form that appears, including X-HWID.
- Confirm the addition and wait for the result.
Method 2: manually by link
- On the access page, copy your personal subscription link in full.
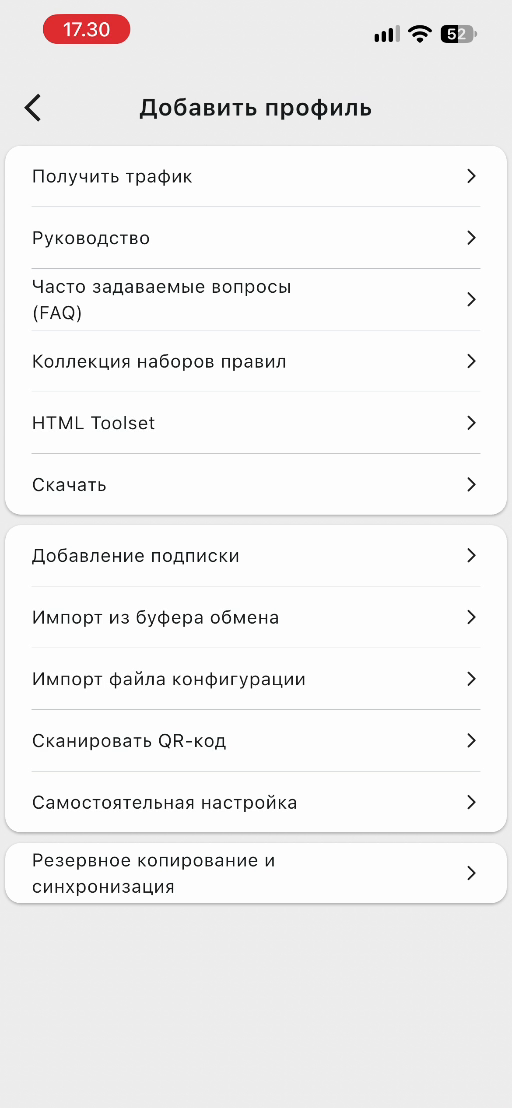
- In Karing, open Add Profile. The home screen may have a + Add Profile tile; the same item is available in Settings.
- Choose Add Profile Link.
- Tap the Profile Link/Content field and choose Paste.
- In Remark, specify a clear name if you wish, for example 4TO — main.
- For a 4TO subscription, turn on X-HWID.
- Check the other parameters described below.
- Tap ✓ at the top right.
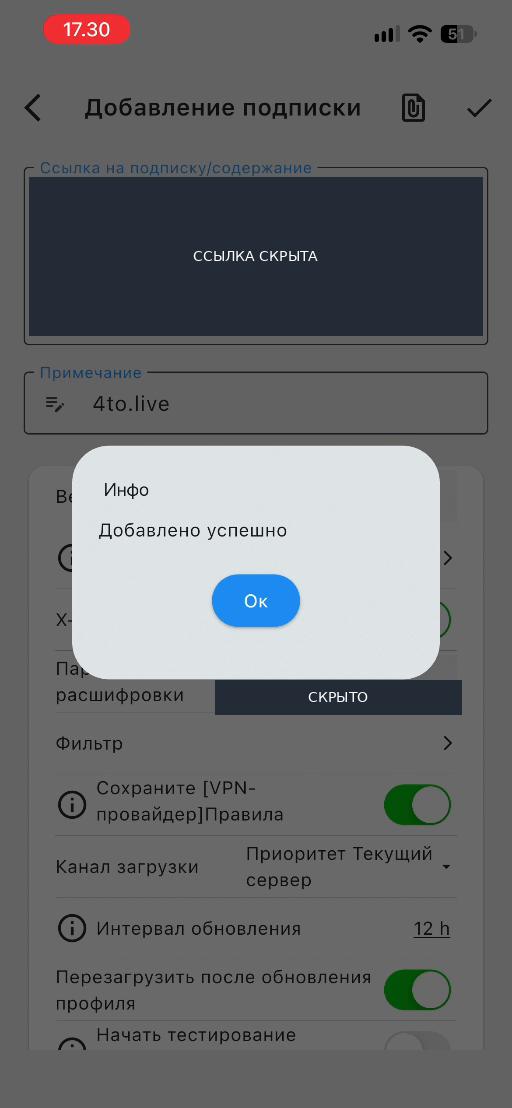
- Wait for the Added successfully message, tap Ok, and go back to the home screen.
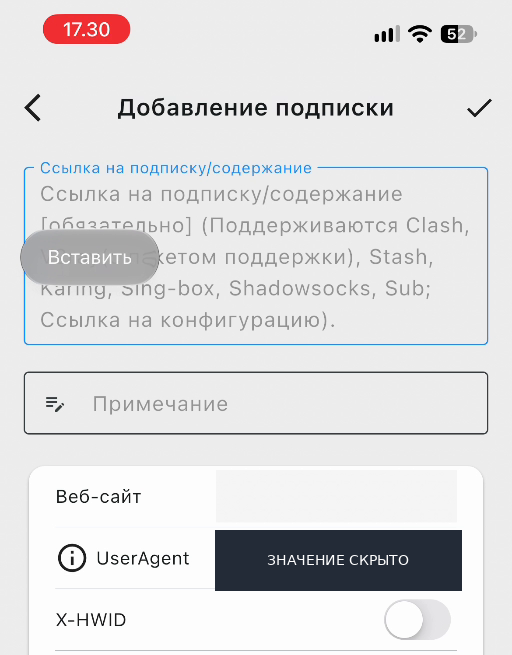
Do not copy the link from the address bar of your account page instead of the import link. Do not add spaces, explanations, or quotation marks to the personal address.
X-HWID: an important parameter for getting servers
The X-HWID switch allows sending the device identifier to the service when the subscription is downloaded and updated. This is needed when the service counts devices by HWID.
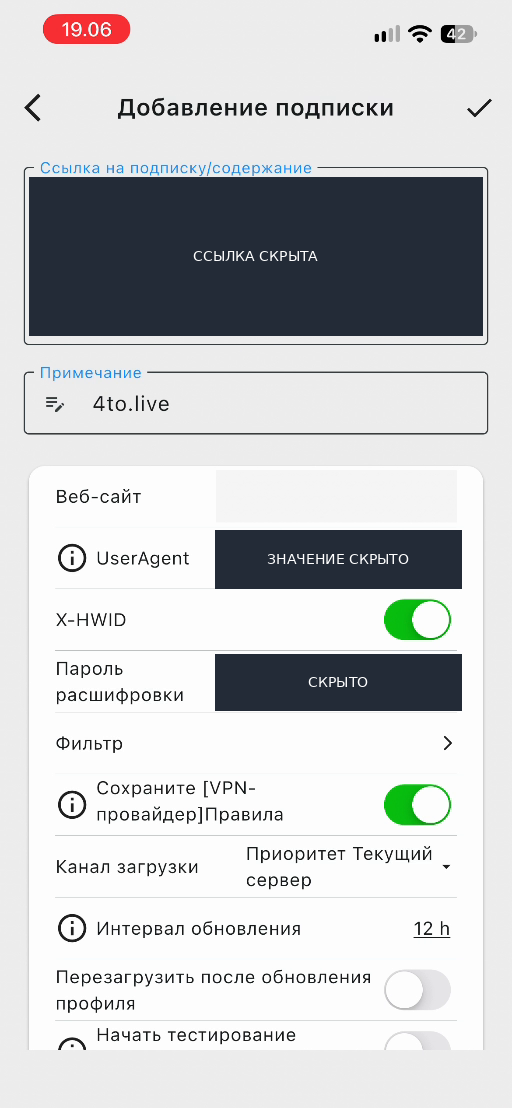
If, instead of regular servers, you see items telling you to turn on HWID sending and update the subscription, the import has not yet produced a working server list. Do the following:
- Open My Profiles.
- Next to the subscription you need, tap the edit icon, the pencil.
- Turn on X-HWID and save the changes with the checkmark.
- Update exactly this subscription with the ↻ button.
- Open the server selection again and check that regular locations have appeared.
If the service reports that the device limit has been exceeded, check the available devices in your account or contact support. Creating identical profiles many times does not solve this problem.
Which form parameters to check
| Parameter | What it means | What to do for a regular addition |
|---|---|---|
| UserAgent | Tells the service the client type; may affect the response format | Keep the value set by the correct import button. If there is a format error, ask support which value fits |
| X-HWID | Sends the device identifier | Turn on for 4TO access |
| Decrypt Password | Password of an encrypted configuration | Leave empty if the service did not issue a separate password |
| Filter | Limits the imported servers | Do not set random filters for the first download |
| Keep [VPN provider] Diversion Rules | Keeps the rules that arrive with a supported configuration | Turn on if you want to use the service’s rules; some formats, for example a plain V2Ray list, may not contain such rules |
| Download Channel | Defines the path for downloading the configuration | Leave the working value; if the link is unreachable, check downloading directly or through an already working server |
| Update interval | How often to fetch the current subscription | Leave the suggested interval; in the screenshot it is 12 hours |
| Reload after Profile update | Applies the updated configuration | You can turn it on; keep in mind a possible interruption of current connections |
Do not put random text into UserAgent. It is a technical request parameter, not a subscription name and not a way to renew a plan.
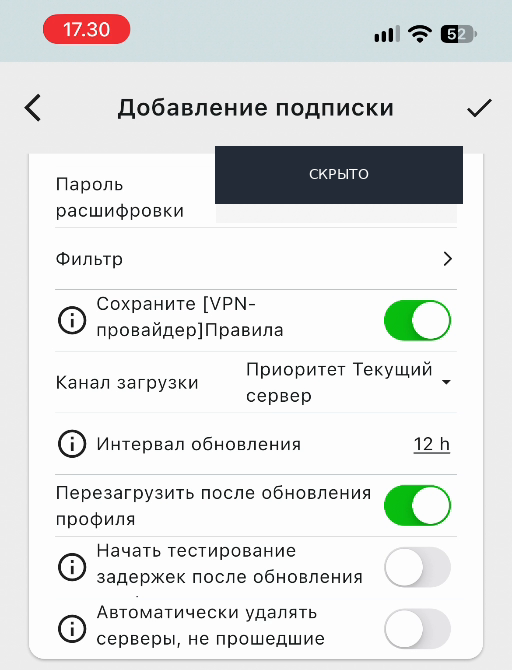
The Start latency tests after Profile Automatically update item requires a working connection and the reload after the update to be turned on. It is better to leave Automatically remove servers that fail latency tests off during the first setup: an unreachable test address does not yet prove that the server should be removed.
Other import methods
From the clipboard. Copy the link and choose Add Profile → Import From Clipboard. Allow pasting if the system asks for access. After adding, still check the subscription parameters and that servers are present.
By QR code. Open Scan QR Code, allow camera access, and scan the code of your subscription. If the code is open on this same phone, it is usually easier to copy the link. Use image import if it is available in the scanner window on your platform.
From a file. Open Import Profile File, choose the compatible file issued by the service, and complete the import. Such a profile may have no remote link for updating: you will have to get new servers with a new file. A backup ZIP is restored through the backup section, not as a separate server.
Karing does not require you to rewrite the address, port, UUID, SNI, and keys of every server by hand if the subscription already contains this data. Changing server parameters manually easily breaks a working configuration, and a subscription update may restore the service’s values.
Choosing a server, checking latency, and connecting
How to open the server list
On the home screen, tap the current server name at the bottom. Select Server opens.
Expand your subscription’s group with the arrow to the left of its name. The number of servers may be shown in square brackets next to the name. The set of locations, the names, and the available protocols are determined by the subscription and may change.
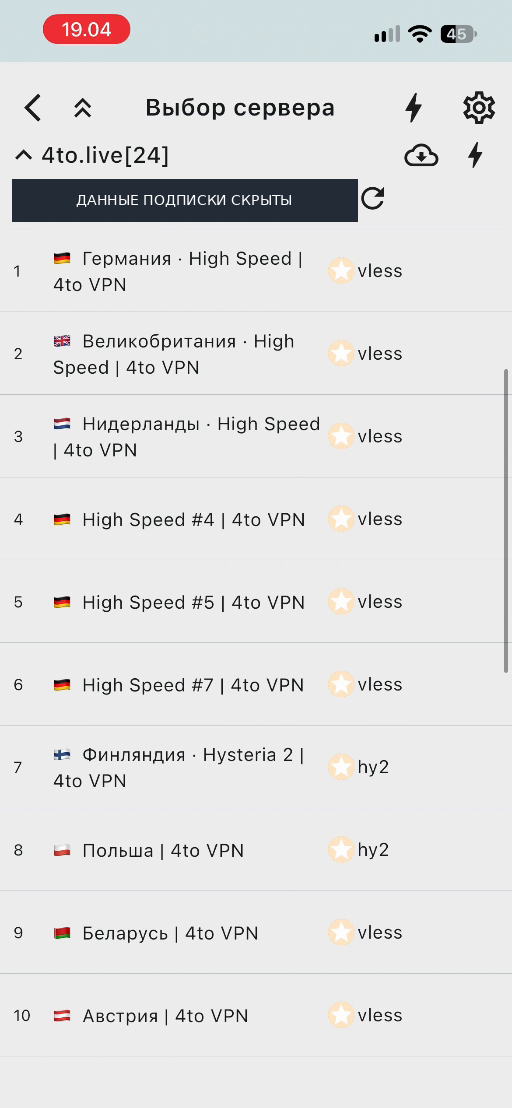
To choose manually, tap the server you want and go back to the home screen. Check that the bottom line shows the selected name.
Direct means a direct exit without a VPN server. If you choose this item, a working connection icon alone will not give you an exit through the selected country.
What the lightning bolt and the number in milliseconds show
In the server list, tap ⚡. The general button starts checking the available candidates; the button next to a group applies to its servers.
On iPhone, first start the connection and confirm the system permission. If the check answers service is not running before that, do the first launch, then go back to the lightning bolt.
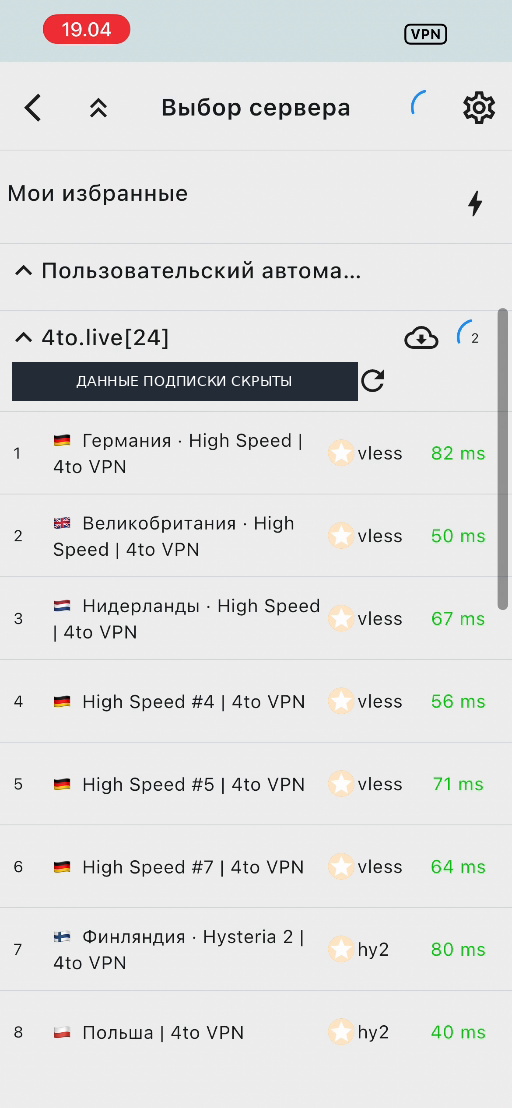
For example, 40 ms is the time of a test request through the server. It is not 40 Mbit/s. Video loading is also affected by server bandwidth, your carrier’s network, the route, and load.
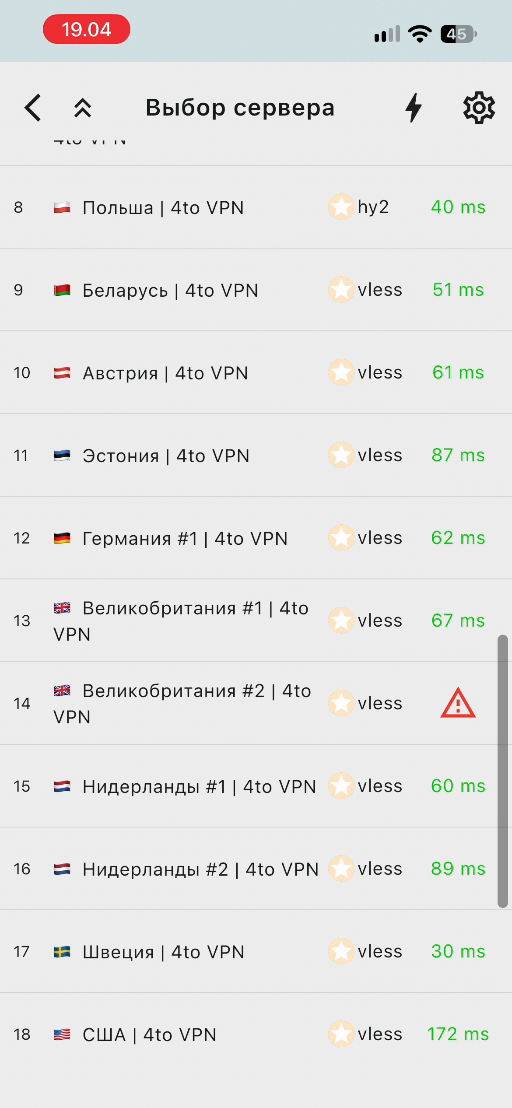
A red triangle means a check error. Tap the error result to see its description, if the app offers details. To connect, you can choose another working server.
How Auto Select works
At the top of the server selection there is Auto Select. It uses suitable candidates from the enabled configurations and the latency check results. If you have added several subscriptions, take into account which of them are enabled.
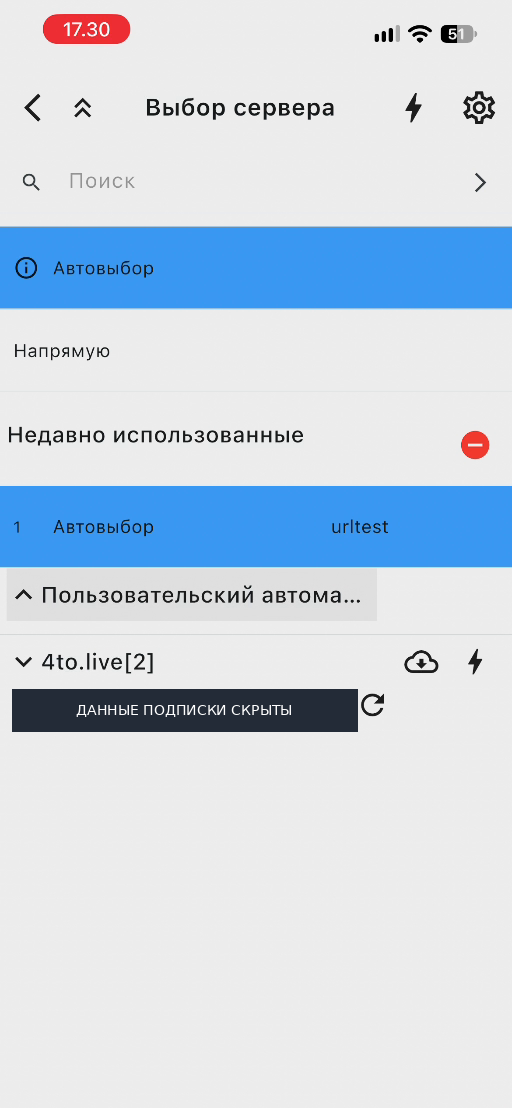
Auto Select is convenient for everyday use, but it does not guarantee a constant country or a single external IP. For a service where one location matters, choose a specific server or create a Custom Auto Select with a limited set of candidates.
The lowest ping does not always give the best speed. If automatic selection is inconvenient for video or calls, compare several locations manually. Changing the server during an important download or video call is not advisable: the connection may drop.
How to tell the VPN is on
- On the home screen, check the selected server.
- For now, keep the Rule mode.
- Tap the round button with the shield.
- Confirm the system request if it appeared.
- Wait for the green state and for the run time to start increasing.
- Open the site or app you need.
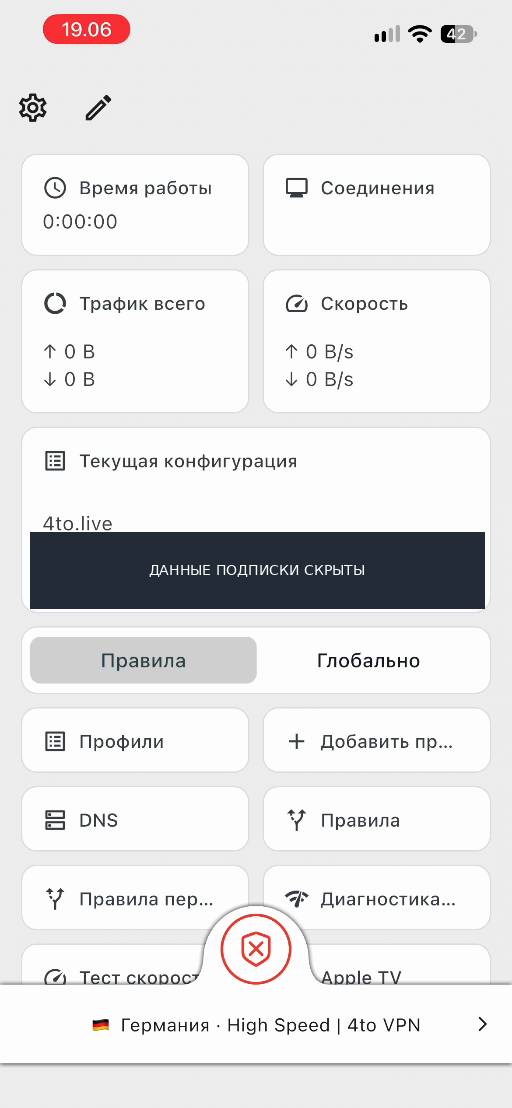
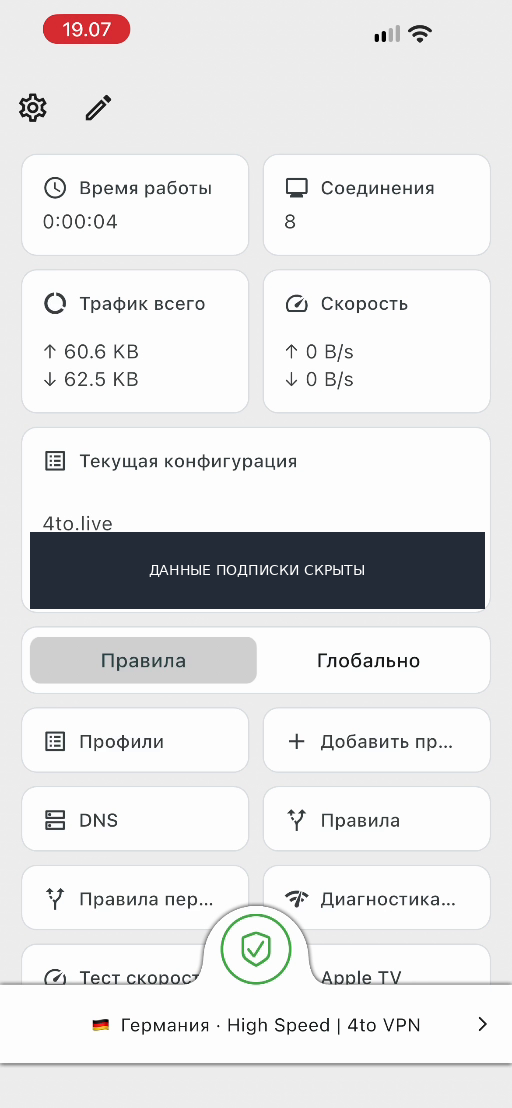
In Rule mode, the IP-checking site is also subject to routing. If it falls under a direct exception, it will show your regular IP. Check the specific resource and its route, not only the color of the VPN icon.
To disconnect, tap the connect button again and wait for it to stop. Minimizing the app or closing its window does not always mean the VPN is off.
Android: installation and background operation
Install the APK via Chrome
- Open the official Karing download page in Chrome.
- Download the suitable Android APK.
- Open the file from Chrome’s downloads.
- If installing from this source is prohibited, allow it for Chrome.
- Go back to the APK, tap Install, and open Karing.
Manual path to the permission: Settings → Apps → Special app access → Install unknown apps → Chrome. Turn on the permission to install from this source. On some device shells the names differ.
If you open the APK through the Files app, Android may ask for the same permission separately for it. Detailed screens and path variants are in the APK guide.2
Add access and turn on the VPN
Initial setup, the subscription link, X-HWID, and server selection work the same way as described above. On the first connection, confirm the Android system request to create a VPN connection.
In Settings → TUN, leave TUN Mode turned on for a regular VPN. Traffic capture and route selection are different settings: the connections that reach Karing are then handled by the Rule or Global mode.
Another active VPN, a local VPN blocker, or a second VPN profile on Android may turn Karing off. On one Android user profile, only one such connection usually works.
If Android stops Karing
In the system app card, allow background operation and choose the battery mode Unrestricted or the manufacturer’s equivalent. If there is a separate autostart permission, turn it on for Karing.
Check the connection after the screen locks. If the app is unloaded after a few minutes, fix the battery restrictions first — changing domain rules will not stop the system from killing the process.
The system mode Always-on VPN can keep the connection up. Use the Block connections without VPN option with your own exceptions in mind: apps taken out of the tunnel may lose internet.
App selection is covered in detail below. iPhone has no such Android list.
Windows: installation, system proxy, and TUN
Install the client
- On the official page, choose the stable Windows x64 installer.
- Run the EXE and confirm the system installation prompt.
- Finish the installation and open Karing.
- Add the subscription, check X-HWID, and choose a server.
If you use the ZIP, first extract the entire archive into a separate folder. Do not run a single EXE directly from the archive window: the libraries and network core files must be next to it.
Choose a traffic capture method
| Method | What it covers | When it fits |
|---|---|---|
| System Proxy | Programs that respect the Windows proxy settings | A browser and apps that support the system proxy |
| TUN Mode | Traffic through a virtual network interface, taking routes and exceptions into account | Games, UDP, and apps that ignore the system proxy |
You can turn on the system proxy on the home screen. The additional option Auto Set System Proxy when Connected is in Settings. If the core is stopped, a leftover local proxy in the system may prevent internet access.
For TUN, open Settings → TUN → TUN Mode. On Windows, Karing must be run as administrator: close the app, right-click its shortcut, and choose the corresponding item. Then turn on TUN and start the connection.
For the first test, choose one clear method. TUN lets you leave the system proxy off. Turning on both methods at once is not required for operation.
The Rule / Global modes are selected separately and control the connections that have already been captured. Pressing Global does not make a program that ignores the system proxy start using it.
Autostart and shutdown
First check the manual connection, then set up Launch at Startup and Auto Connection after Launch if you need them. For Windows autostart with TUN, turn on the startup setting from an app that is already running with administrator rights.
Before uninstalling the client, properly disconnect the connection and the system proxy. Closing the window may minimize Karing, so check the actual status and the tray icon.
macOS: installation and network extension
- Open the official macOS section and download the stable package for Mac.
- For DMG, open the image and drag Karing to Applications. For PKG, go through the installer steps.
- Launch the installed app.
- Confirm the system prompts to set up the VPN and the Karing network extension.
- Add the subscription, check X-HWID, and choose a server.
- Start the connection and check the resource you need.
The universal macOS build is for Intel and Apple Silicon. Do not choose the Windows file for a Mac. If you use the version installed from the App Store, update it through the same store.
If the system asks for the Mac administrator password, this refers to the computer’s local account. Your Apple Account password and your subscription password are not used in the administrator confirmation field.
For a regular VPN, leave TUN Mode turned on. On Mac there is also a system proxy for programs that support it, but turning TUN off while the network extension is running requires a separate check of how traffic is passed.
When you use process rules, the ability to identify the app depends on the system permissions of the network component. If macOS shows an access request for a Karing component, check that it belongs to the installed app and what the request is for. A domain exception and a process rule solve different tasks.
Linux: packages and first connection
Check the architecture:
uname -m
For the verified x64 / amd64 packages, x86_64 is expected. For aarch64 you need a separate supported ARM variant; renaming an amd64 package does not change the architecture.
The official download page states Linux kernel 6 or newer. For current DEB packages, a compatible glibc also matters; the project’s current documentation states glibc 2.38+. If the package does not start on an older distribution, check the requirements of the specific release you chose.
DEB: Debian, Ubuntu, and derivatives
Open a terminal in the folder with the downloaded file. Example for the verified stable version:
sudo apt install ./karing_1.2.25.2802_linux_amd64.deb
RPM: systems with DNF
sudo dnf install ./karing_1.2.25.2802_linux_amd64.rpm
AppImage
If a suitable AppImage is published in the official release you chose:
chmod +x karing_1.2.25.2802_linux_amd64.AppImage
./karing_1.2.25.2802_linux_amd64.AppImage
For another version, replace the file name with the actual one. If you get a FUSE error, check that a compatible FUSE library is installed in your distribution. AppImage does not guarantee compatibility with every old system.
After installation, open Karing from the menu, add the subscription, choose a server, and check the connection. The system proxy depends on the desktop environment and on whether the specific program supports it. For capture through TUN, the appropriate network permissions are needed; if startup fails, look at the core message and the package requirements. Do not change the permissions of random system files following someone else’s instructions.
If the system proxy works but a game goes direct, check TUN and the rules: these methods cover different traffic. On Linux it is especially helpful to attach the distribution name, kernel version, architecture, and the full text of the startup error to your support request.
Apple TV: transferring the configuration from your phone
On Apple TV, the procedure differs from the usual pasting of a URL on a phone.
- Install Karing on an Apple TV with tvOS 17 or later.
- On a mobile device with Karing, add the subscription beforehand and check the connection.
- Connect the phone and the TV to the same home network.
- Open Karing on Apple TV and leave its QR code on the screen.
- On the phone, open scanning inside Karing and scan the TV’s code.
- Wait for the Apple TV control center to open in mobile Karing.
- Tap the upload / send configuration button at the top of this screen.
- Wait for the synchronization to finish.
- On Apple TV, start the connection and confirm the system prompt if it appears.
The TV’s QR code is a control and transfer code, not a public subscription. Do not paste it into the link field as a separate VPN server.
The TV receives the generated core configuration. If you later change routing or settings on the phone, send the configuration to Apple TV again and restart the TV’s connection. A change on the phone alone does not guarantee a change in the configuration already loaded on the TV.
If the transfer does not work, check the shared network, the ban on communication between devices on guest Wi-Fi, and the local network access restrictions. If another VPN is turned on on the phone, the TV’s local address may be unreachable.
Android TV and Google TV
The official page has a separate Android TV section. It offers a build for armeabi-v7a; check its compatibility with the box’s Android system.
- Download the suitable APK and transfer it to the TV, or download it directly on the TV.
- Open the APK through a file manager or a browser.
- Allow installation for this particular source.
- Install Karing, choose the language, and go through the initial setup.
- Add the subscription through the Add Profile Link item, or restore a prepared configuration through Karing’s standard synchronization.
- Check X-HWID, choose a working server, and turn on the VPN.
Do not apply the Apple TV control center steps to Android TV: that is a separate scenario. For manual entry of a long link, it is easier to use a keyboard or an input tool that the box itself supports.
If the home screen is hard to control with a remote, check Karing’s screen rotation setting: the developer recommends turning on Rotate with the screen if you have problems moving focus on Android TV. After changing it, check navigation with the arrows and the OK button.
Rule and Global modes
The Karing home screen has a Rule / Global switch. It is a way to choose the route for connections that have already reached the client.
| Mode | What it does | When to use |
|---|---|---|
| Rule | Checks the diversion rules and picks the outbound for each match | Permanent connection, exceptions for banks, separate routes for services |
| Global | Uses the currently selected outbound for captured traffic instead of the usual rule-based split | Temporary server check or a connection through one chosen outbound |
For your own exceptions, use Rule. In Global mode, do not count on an ordinary domain exception for a bank being applied. At the same time, TUN capture, excluded apps, and separate local route settings still affect which traffic reaches Karing at all.
The Direct outbound is chosen in the server list. It is not the same as turning the app off: the network component may keep running while connections go without a VPN server.
After changing the mode or the server, open the site again. An already established connection of an app may use the old route for some time.
Routing: how Karing rules work
Before manual setup, save a backup and turn off Novice Mode in Settings: it hides some of the advanced parameters and does not apply them.
In Karing it helps to separate two things:
- Custom Diversion Group contains the conditions: domains, IPs, processes, and other connection attributes.
- Diversion Rules assign an action to these groups: the current server, automatic selection, a direct connection, or blocking.
Path to the setting: Settings → Diversion → Diversion Rules. The home screen may also have a matching Diversion Rules tile, whose label may appear shortened. Do not confuse it with the Rule / Global mode switch.
Which outbounds are available
| Action | Result |
|---|---|
| Current Selected | Uses the choice from the home screen: a specific server, Auto Select, or another selected outbound |
| Auto Select | Uses automatic selection from the available candidates |
| Direct | Opens the connection through the regular internet without a VPN server |
| Block | Prohibits the connection |
| A specific server or a custom group | Pins the chosen outbound to the rule regardless of the main choice, as long as it is available |
| None | Does not apply this group of rules; the connection is checked against the other rules |
If Direct is selected on the home screen, the Current Selected rule will not give a VPN exit either. So check both the rule and the actual main choice.
Rule order and final
Rules are checked from top to bottom. The first matching rule is used. Traffic that did not match any earlier condition goes to final, the closing route.
Narrow exceptions should come first, then the more general rules. If a broad service rule fires earlier, a later exception may not receive that request.
The order of custom groups is changed in their edit list: hold a row and drag it to the right place. On a computer, use the available drag handle or hold the row with the mouse. After setting up, go back to the home screen and reconnect.
In Karing, final is a separate interface item. For the regular recipes below, you do not need to paste the MATCH string from someone else’s Clash configuration into the domain field.
How to create a custom group with domains
- Turn on the Rule mode on the home screen.
- Open Settings → Diversion → Diversion Rules.
- Tap the pencil at the top right — Custom Diversion Group opens.
- Tap +, then choose adding a regular group. If several Add options are offered, choose the one with a plain plus, not the presets.
- Enter a name in Remark, for example Bank direct, and confirm.
- Tap the group you created to open its conditions.
- Find Domain Suffix.
- Enter the domain you need without the protocol and path. Put several domains on separate lines.
- Save the conditions with the ✓ button at the top right.
- Go back from the editor to Diversion Rules.
- Make sure the Custom Diversion Group section is turned on.
- Tap your group and assign the action you need.
- If a menu with the items Rule and DNS appeared, tap Rule to choose the outbound.
- Go back to the home screen, stop the connection, and start it again.
For an ordinary list of alternative domains, keep the OR logic: one matching condition is enough. The AND mode is needed when you deliberately want several conditions to hold at the same time, for example a particular process and a particular domain. Switching the logic by accident can make a rule too narrow or too broad.
How to write a domain correctly
| Field | Example | What it covers |
|---|---|---|
| Domain Suffix | example.org |
The root domain and its subdomains, for example www.example.org and login.example.org |
| Domain | login.example.org |
A specific full name |
| Domain Keyword | example |
Domains containing this fragment; the rule is broader and may catch extra ones |
| IP Cidr | 192.168.50.0/24 |
The specified subnet; this is an example, not a universal home network |
Do not paste https://, a page number, /login, a DOMAIN-SUFFIX,... string, or the domain: prefix into the domain field. Take the real domain name from the site’s address.
One app can contact several domains: for login, API, images, video streams, and notifications. If the main page opened but login does not work, find the additional requests in Connect and refine the rule.
Scenario 1: bank direct, the other rules stay in place
- Create a custom group Bank direct.
- Add the bank’s known domains to Domain Suffix.
- In Diversion Rules, assign this group Direct.
- Place the exception above the broader custom groups.
- Keep the other rules you need and the current final.
- Reconnect and open the bank again.
This scheme changes the route of the matched domains. It does not guarantee that all the traffic of the bank app is covered by one domain. On Android, to exclude an app entirely, the Per-App Proxy section is more convenient.
Scenario 2: bank direct, everything else through the current server
First save a backup. For a fully custom scheme, you need to account for both the subscription’s rules and the presets enabled earlier.
- Choose Rule.
- Create the bank group and assign Direct.
- At the bottom of Diversion Rules, open final.
- Assign Current Selected.
- On the home screen, choose a working VPN server or a suitable Auto Select.
- Remove old groups that conflict with this scheme. For a fully custom scheme, you can turn on Disable [VPN provider] Diversion Rules and separately turn off the unneeded built-in and custom groups.
- Reconnect and check the bank and another site.
Resulting logic:
| What matched | Action |
|---|---|
| The bank’s domains | Direct |
| All other traffic that reached final | Current Selected |
If you need a printer, a home server, or a router, keep Private Network Direct connection or suitable exceptions for local addresses. ‘Everything else’ in the example refers to ordinary captured traffic, taking such exceptions into account.
Scenario 3: only selected sites through the VPN
- Save a backup and choose Rule.
- Create a group, for example Through VPN.
- Write the domains you need in Domain Suffix, on separate lines.
- Assign the group Current Selected or a specific suitable outbound.
- For final, choose Direct.
- Turn off the other groups that send additional sites through the proxy. If the service’s rules are not needed for your scheme, turn them off with the corresponding switch.
- Check the main server on the home screen and reconnect.
| What matched | Action |
|---|---|
| Domains from the “Through VPN” group | Current Selected |
| Everything else that reached final | Direct |
If you leave other active groups, they will keep working: changing final alone is not enough to promise ‘only these sites through the VPN’.
Subscription rules and your own rules
The Keep [VPN provider] Diversion Rules switch in the profile controls whether the rules from a supported subscription response are kept. The general switch Disable [VPN provider] Diversion Rules controls whether they are applied in your scheme. Creating a Custom Diversion Group is yet another, separate action.
If the settings look contradictory, first decide which scheme you want to use: the service’s ready-made one with a single exception, or a fully custom one. For a single bank exception, you usually do not need to turn off the whole service set.
Karing uses its own routing layer and supports rules from several sources. Do not mechanically carry over the FlClashX instruction with the YAML override: the clients work with the interface in a different order.3
Built-in Rule Sets and GeoIP / GeoSite
In a custom group, you can choose built-in sets through Rule Set (build-in) or add a supported external set. The category must actually exist in the installed databases.
GeoSite describes groups of domains, GeoIP groups of IP addresses. A conventional name like ru-blocked from another client does not have to exist in Karing. An external set needs a suitable format, for example .srs or a supported .json, and a direct file address.
After adding a set, assign an outbound to the custom group in Diversion Rules. Downloading a list of domains does not by itself choose an action for it.
Android: choosing apps for the VPN
On Android, there is a way, separate from domain rules, to define which apps go into the tunnel.
- Open Settings → TUN → Per-App Proxy.
- Make sure TUN mode is on, otherwise the item may be unavailable.
- Turn on Enable.
- Choose whether you need Whitelist Mode.
- Check the apps.
- Go back and reconnect the VPN.
| Whitelist Mode | What to check | How it works |
|---|---|---|
| On | Apps that need the VPN | Only the selected apps go into the VPN; the others bypass the tunnel |
| Off | Exception apps | The selected apps bypass the VPN; the others go into the tunnel |
Example: only a browser and Telegram. Turn on the whitelist, check the browser you need and Telegram, then reconnect.
Example: everything except the bank. Turn off the whitelist and check the banking app. After reconnecting, its traffic will stay outside the tunnel.
In the whitelist, be sure to select the apps you need. Do not use an empty list as a way to forbid the internet to all programs.
If the list is empty or you do not see the program you need, check the search, the hiding of system apps, and the permission to get the app list in your phone’s firmware.
Outbound rules continue to apply to the apps that end up in the tunnel. Including a browser in the VPN does not cancel a domain Direct rule inside Karing. A domain rule cannot return an app that is excluded from the tunnel back into the VPN.
If an excluded bank lost internet, check the Android system option Block connections without VPN. For split access, it may be incompatible with the result you want.
On iPhone and iPad, Karing provides no similar general app list. For ordinary personal setup, use domain rules; do not look for the Android switch in iOS settings.
Process rules on a computer
On a computer, you can create custom rules by Process Name or Process Path.
- Make sure the program’s connections reach Karing. For a program that ignores the system proxy, TUN is usually needed.
- Create a custom group, for example Program direct.
- In the editor, fill in Process Name or Process Path.
- Save the group and assign it Direct or the server you need in Diversion Rules.
- Place the rule above the broader match.
- Reconnect and restart the program you are testing.
For Windows, an example name is Telegram.exe. Use the actual name of the installed program and mind the letter case. On Mac and Linux, the name and path will be different; a Windows .exe file does not fit there.
A program may have additional processes, updaters, and a separate network helper. If some requests stayed on another route, look at the real process of the connection. Whether it can be identified depends on the system and on Karing’s permissions.
Do not fill in a domain and a process in one group without understanding the OR / AND logic. With OR, the rule may cover any listed domain from any program; with AND, only the needed combination of conditions.
Custom Auto Select
The regular Auto Select may consider more servers than a specific task needs. To limit the candidates, create a separate set:
- Open Settings → Diversion → Custom Auto Select.
- Tap +.
- Enter a clear name, for example One country — auto.
- Open the set you created and choose the servers you need from the list offered.
- Save the choice and go back to the server list.
- Choose the custom group you created as the main outbound, or assign it to a separate rule.
- Check how it works after reconnecting.
Include several servers that really fit. If all the candidates are unavailable, the mere existence of an automatic group will not create a connection. After a subscription update, check whether the selected servers and their names have been preserved.
Even inside one country, automatic server switching can change the external IP. For a permanent specific exit, choose one server manually.
DNS: how not to break a working configuration
DNS translates a domain name into an IP address. In Karing its settings are tied to routing, but choosing DNS and choosing a VPN server are different actions.
The DNS section is available on the home screen and in Settings. For the first connection, leave the initial values. If sites work, extra DNS setup is not required.
| Category | Purpose |
|---|---|
| Proxy Server | Getting the IP by the name of the VPN server itself, to start the connection |
| Direct Traffic | Name resolution for direct connections |
| Proxy Traffic | Name resolution for connections through the proxy |
| final | Final DNS handling for the corresponding scheme |
| DNS Server | Name resolution of the DNS servers themselves |
In Novice Mode, some categories are merged. So not all the parameters of the advanced instructions are necessarily visible on the first screen.
Enable DNS Diversion rules lets you choose DNS by rules. With a deliberate setup, it is important that DNS for the VPN server’s name is reachable before the tunnel is established. Otherwise a dependency arises: the connection needs DNS, and the chosen DNS is reachable only after the connection.
FakeIP
FakeIP uses service addresses to handle domain requests in TUN. Such an address does not mean the real location of the site. It is an additional DNS handling mode, not a separate VPN server.
If, after turning on FakeIP, an app stopped opening a site, first return the previous value and restart the app you are testing. After the VPN is turned off, old service addresses may remain in its memory until a new request or a restart.
Changing DNS does not take a site out of the VPN automatically. To open a bank directly, assign Direct in routing or exclude the Android app from the tunnel.
How to check changes
- Change one parameter at a time.
- Reconnect and create a new request to the site.
- If it got worse, return the previous value.
- To check, use the DNS diagnostics and the actual connection to the resource you need.
Do not turn off certificate verification and do not turn on arbitrary DNS, Mux, WARP, or a chain proxy as a universal ‘speedup’. For an ordinary subscription, the service has already prepared the server parameters.
Updating the subscription, the app, and autostart
Update the subscription
Open My Profiles, find your subscription, and tap the ↻ button. It may also be shown next to the group data in the server selection. Wait for it to finish, then check the set of servers.
After renewing your plan, turning on X-HWID, or changing your access, first update the existing profile. The update fetches new servers and information from the service; it does not pay for or extend access.
If Reload after Profile update is turned on, the updated parameters will be applied with a restart of connections. Before updating during a call or a download, keep in mind a possible interruption.
Update interval sets the background download of the configuration. Frequent updates do not increase speed. If the service suggests a reasonable interval, keep it and use manual update after a specific change.
Update Karing
On iPhone, iPad, and Apple TV, use App Store updates. On other systems, use Karing’s built-in notification or the stable download from the official page for your platform.
Save a backup before a major update. For a regular update, you do not need to uninstall the app with its data first. On Android, the downloaded APK must belong to the same app and carry the official signature.
Updating the profile and updating the app are different actions. If the service added a server, updating the subscription is usually enough. If support for a new protocol is required, a new client version may be needed.
Automatic connection
In Settings, distinguish between Launch at Startup, Auto Connection after Launch, and Auto Connection after System Startup — their availability depends on the platform.
On Apple devices, keeping the connection up is tied to connecting on demand. If the system VPN turns on again right after you turn it off manually, check the corresponding Karing option and Connect On Demand in the VPN details. For a regular disconnect, use Karing’s own button.
First get a working connection manually, then turn on automation. Autostart will not fix a missing VPN permission, a wrong profile, or an unavailable server.
Backups and moving your settings
Save a copy before a serious change of rules, before clearing data, or before moving to another device.
Export to ZIP
- Open Settings → Backup and Sync.
- Choose Import and Export.
- Tap Export.
- Save the ZIP to the folder you choose or through the system file menu.
- Check that the file was really saved.
Import on another device
- Install Karing on the new device.
- Open the same Import and Export section.
- Choose Import and specify the Karing ZIP.
- In the confirmation window, check which data is being restored: My Profiles, Diversion, Settings, and any additional categories available.
- If you are moving only access and your own rules between different systems, do not blindly transfer unsuitable network parameters.
- Finish the restore and check TUN, permissions, X-HWID, and the selected server.
- On the new device, update the subscription and check the connection.
On the new device, the HWID will be its own. Moving settings does not cancel the service’s device limit. A rule with a Windows process and a list of Android packages also do not automatically become suitable for another system.
iCloud, WebDAV, and LAN
| Method | What it is good for | What to keep in mind |
|---|---|---|
| iCloud | Transfer and sync between supported Apple devices | You need access to your own iCloud; check the available actions in the backup section |
| WebDAV | Storing a copy on your own compatible server | You need the server address, login, password, and the correct path |
| LAN Sync | Transfer between devices on the same local network | The network must allow communication between devices; keep the transfer window open |
| ZIP file | A one-off controlled transfer | The file must be passed on privately and imported manually |
For LAN, open the corresponding item on both devices and choose the suitable send and receive actions. The QR code is scanned through the standard Karing flow. Do not confuse this code with the subscription QR code or with the separate Apple TV screen.
A backup from another client is not the same as a Karing copy. When moving from Happ, INCY, or FlClashX, it is easier to add the original link again in a compatible format and set up Karing rules, or to use a specially supported import.
Checking the route and diagnostics
On the home screen, Connect shows the current requests and details about them. If you do not understand why a site goes direct, first create a new connection: open the site again or restart the app.
Check:
- The destination address — whether it is the domain you added the rule for.
- The selected outbound — the current server, another server, a direct connection, or a block.
- The matched rule, if it is shown for this connection.
- The program or process, if the system allows identifying it.
In Settings → Diversion → Diversion Rule Detect you can test a domain name. This test is useful for finding errors in a list, but it does not model all the conditions of a real request: for example, the process, the IP, an app exception, or an old open session. If the results differ, also rely on the actual connection.
Net Check helps check the network, DNS, and the selected server. Successfully getting an IP does not yet prove that a particular video service works without restrictions. Check the action you need: logging in, opening a video, downloading a file.
Common problems and solutions
“service is not running” during the latency check
This means the client’s network service is not running yet. On iPhone, such a message may appear if you tap the lightning bolt right after the import without having started the VPN for the first time.
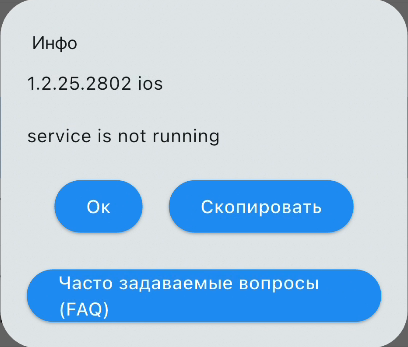
- Close the message.
- Go back to the home screen.
- Choose a regular server from the subscription.
- Tap the connect button.
- Confirm the system VPN permission.
- After it starts, open the server list again and repeat the check.
If you declined the permission, try starting again and check the system VPN settings. There is no need to delete the subscription right away.
Two instruction lines instead of servers
If the lines ask you to turn on HWID sending, open the subscription editing, turn on X-HWID, save, and update the profile. Check that you applied the change to the right subscription, especially if you added several identical cards.
The link will not add
Check that you copied the subscription URL, not the login page or the account page. Remove any extra text and copy the address again in full.
If the error is related to the format, make sure the service issues a format compatible with Karing. UserAgent matters too: one service can return different content to different clients. Do not send a private link to a random third-party converter.
On a network timeout, check your regular internet and the availability of the service. If the device already has a working connection, you can check the provided download channel through it. On HTTP 401/403, ask support about the status of your access and the device limits.
The VPN is green but the site you need does not open
- Check regular internet after properly turning the VPN off.
- Connect to another server.
- Make sure Direct is not selected instead of a server.
- Update the subscription.
- If you recently changed DNS or rules, revert the last change.
- Compare Wi-Fi and the mobile network.
- Check the device’s date and time.
On a computer, separately check the capture: the app may ignore the system proxy. It needs TUN or its own proxy setting.
It works in Global but not in Rule
Check the matched group and its outbound. Possible causes: a non-working separate server is selected, a block is placed above, the rule is assigned as None, the custom rules section is not turned on, or final sends the traffic the wrong way.
After fixing it, go back to Rule and repeat the check with a new connection. If Global mode does not work either, first check the network, the server, and the tunnel start.
A custom rule is created but does not work
| What to check | Why it matters |
|---|---|
| The group has an action assigned | Conditions without an outbound do not complete the setup |
| Custom Diversion Group is turned on | A turned-off section is not applied |
| The Rule mode is selected on the home screen | Global mode bypasses the usual split |
| The domain matches the real request | Login and video may use other addresses |
| The rule comes before a general match | The first match determines the route |
| The suitable OR / AND logic is selected | An incompatible combination of conditions may never match |
| The connection was created anew | An old session may keep the previous route |
| The program reaches Karing | An excluded Android app or a program without system proxy support is not checked by these rules |
Manual server edits disappeared after an update
A remote subscription is downloaded anew. Manual edits to the address or keys of its servers may be overwritten. Set custom conditions in Custom Diversion Group, and ask the service about erroneous server parameters.
If whole custom groups disappeared, check the backup restore, the re-applying of presets, and the data set you selected. Save a copy of the working state before making further changes.
The VPN turns off in the background
On Android, check the battery restrictions and the permission for background operation. On Apple devices, check keeping the connection up on demand. When switching from Wi-Fi to the mobile network, try another server: the availability of transports can differ among carriers.
Do not change all the settings at once. First find out whether the VPN connection itself stopped, or it stays on but one service stopped responding.
TUN does not turn on in Windows
Close Karing, run it as administrator, and try turning it on again. If the error remains, check the message text, that the core files are next to the app, and whether there is a conflict with another running VPN.
Launching a single EXE from a ZIP without extracting the other files is a common cause of an incomplete installation. Permission to run and a network interface conflict are different problems; fix the one the client reports.
No internet after disconnecting
On a computer, check the leftover system proxy: the local port address of a stopped Karing cannot serve requests. Open the client and properly turn off the proxy, or remove exactly that setting in the system.
On iPhone or Mac, if you turned TUN Mode off by hand, turn it back on for a regular VPN and reconnect. If connecting on demand is turned on, end the session through Karing and check the corresponding system option.
The router, printer, or home server will not open
Check Private Network Direct connection in the rules, the TUN route exclusions, and the device’s real address. The subnet exception must match your home network.
The Network Sharing setting is meant for giving other devices access to the Karing proxy. It does not automatically create a direct exception for a printer.
How to contact support
Prepare the Karing version, the system and its version, the network type, the selected server, the Rule / Global mode, and the exact error text. Say whether another server works and whether the result changes on another network.
Quick answers
Do I have to pay for Karing separately? The client is free; access to servers is provided by your subscription.
Can I use the same subscription on several devices? It depends on the service’s terms and the device limit. In Karing, check X-HWID on each device and update the profile.
Does a green shield mean that all sites go through the VPN? No. It shows an active connection. The exit is determined by the rules, the main choice, the capture method, and exceptions.
Can I choose a bank as an app on iPhone? The general Android app list is not available there. Use suitable domain rules.
Why does ‘Rule’ appear in different places? The switch on the home screen chooses the mode. The Diversion section contains the routing settings. Custom Diversion Group sets the conditions, and Diversion Rules set the actions.
Do I need to turn on TUN and the system proxy together? No. Choose a method for your tasks and platform. On iOS, leave TUN turned on for a regular VPN; on Windows, TUN requires launching as administrator.
Why doesn’t a good ping help video? The latency check does not measure available speed and does not guarantee that a particular service works. Compare another location and the actual download.
Does updating the profile renew the plan? No. Renew your access with the service, then update the profile to get the current information.
-
Changing the App Store region: what to do if the app is unavailable for your current account. ↩︎
-
Installing an APK on Android via Chrome: permission to install and opening the downloaded file. ↩︎
-
Detailed FlClashX guide: a separate client with its own scheme of profiles, groups, and rules. ↩︎